Java was created by Sun Microsystems between 1991 and 1995, by James Gosling and some colleagues. Gosling intended to create a programming language that would run "anywhere" - that included any platform (Windows, Mac, Linux, etc) and any hardware (PC, mainframe, cell-phone, web-server, etc).
One of the new concepts in Java was the ability to run a program inside a web-page - as an Applet (that means a small application). The real interest in Applets was not so much calculations or any other useful work, but rather to make interesting graphics displays. Now interesting graphics displays are achieved with other tools (Flash, .gif animations, videos), but Java is still a common and interesting tool with good graphics capabilities.
Processing is a version of Java that was created to help graphic artists learn the basics of programing. To facilitate this task:
Here are some web-sites with Processing applets with interesting graphics displays:
http://www.openprocessing.org/
http://www.flong.com/projects/newyear/
The Java language was based on the popular C++ language. The syntax of Java is similar to C++ as well as JavaScript, which was also based on C++. That creates an entire family of languages that use similar commands. So after learning Java, you are well prepared to learn other languages in the same family.
Visual Basic has a long, long history reaching back to the 1960's when the original BASIC (Beginners All-purpose Symbolic Instruction Code). The syntax of Basic is much simpler than Java, making it easier for a beginner to learn Basic. So VB was a good way to start programming graphics displays.
But VB doesn't contain very many low-level (pixel oriented) graphics
commands, and those don't execute very efficiently. Processing
contains some very powerful low-level graphics commands, that execute
efficiently, and that can easily be incorporated into a web-page. So
we will use Processing to create graphics displays that manipulate images
at the pixel level and that execute efficiently in a web-page.
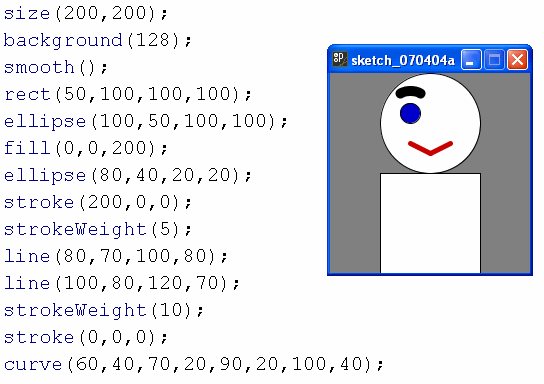
Write a Program to Draw a Face
|
|
Now we can make a nice pattern by drawing LOTS of faces - for example
these 9 copies of Che Guevara by Andy Warhol :
(source: https://upload.wikimedia.org/wikipedia/en/8/89/WarholChe.jpg)
We won't do something so artistic (we are not as good as Andy Warhol),
but we can easily make lots of copies of the faces in our program above.
A method is a collection of Java commands that perform a specific
task.
We assign a name and package the commands up in curly braces, like this:
void setup() |
 |
Now the big advantage of a method is that we can use it over and
over again,
just by saying
Unfortunately, that just draws the same face over and over again, so we just see one face.grimFace();
grimFace();
grimFace();
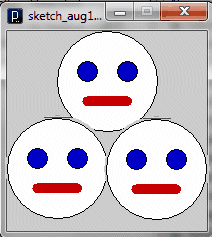
We would like to use grimFace() over and over again, but it
should draw the faces
in 3 different positions.
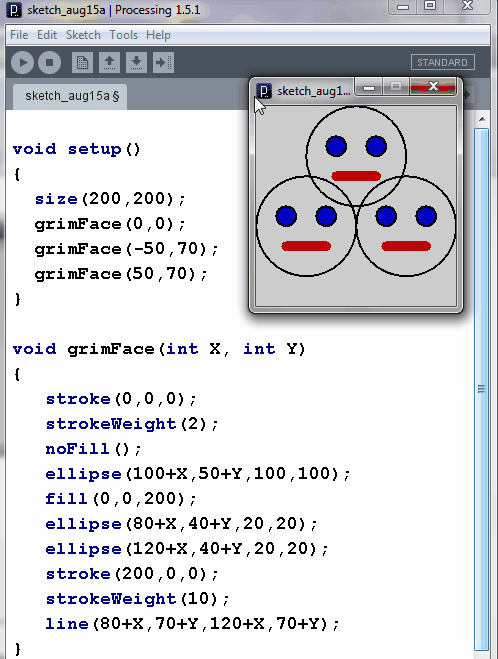
grimFace(100,50);Those positions are just a first guess about where the noses belong.
grimFace(50,140);
grimFace(150,140);
Now the method "knows" that it is going to receive two parametersvoid grimFace(int X, int Y)
{
ellipse(100,50,100,100);
....
}
Now the head (the big circle) is going to be drawn in a different placevoid grimFace(int X, int Y)
{
ellipse(X,Y,100,100);
....
}
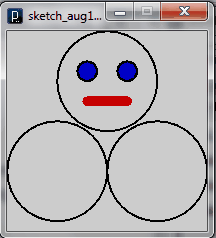
| void setup() { size(200,200); grimFace(100,50); grimFace(50,140); grimFace(150,140); } void grimFace(int X, int Y) { stroke(0,0,0); strokeWeight(2); noFill(); ellipse(100+X,50+Y,100,100); fill(0,0,200); ellipse(80+X,40+Y,20,20); ellipse(120+X,40+Y,20,20); stroke(200,0,0); strokeWeight(10); line(80+X,70+Y,120+X,70+Y); } |
 |
Any number in a method can be replaced or altered by a parameter.
For example, we could have brown eyes instead of blue eyes.
How can we do that? The method looks something like this:
void grimFace(int X, int Y) { stroke(0,0,0); strokeWeight(2); noFill(); ellipse(100+X,50+Y,100,100); fill(0,0,200); ellipse(80+X,40+Y,20,20); ellipse(120+X,40+Y,20,20); ....... } |
Now the eye color is determined by this command:
fill(0,0,200);
To get brown eyes, we would need this command instead:
fill(60,60,0);
To allow the main program to control the eye color, we need to have
parameters
for all 3 color elements - red, green and blue. Since these
parameters are controlling
the eye color, we need to use names like : eyeRed, eyeGreen,
eyeBlue.
So we rewrite the program like this:
void grimFace(int X, int Y, int eyeRed, int eyeGreen, int eyeBlue) { stroke(0,0,0); strokeWeight(2); noFill(); ellipse(100+X,50+Y,100,100); fill(eyeRed, eyeGreen, eyeBlue); // use the parameters here ellipse(80+X,40+Y,20,20); ellipse(120+X,40+Y,20,20); ....... } |
But now all the grimFace commands must also contain numbers for the eye
color:
grimFace(100,50,0 , 0, 250); //
for blue eyes
grimFace(100,50,60, 60, 0);
// for brown eyes
You can add as many parameters as you want - e.g. change the skin color
(fill)
of the entire face, color of the lips, etc.
Practice
| GRIM FACE |
SMILEY |
GRIM FACE |
| SMILEY |
GRIM FACE |
SMILEY |
| GRIM FACE |
SMILEY |
GRIM FACE |
