
| Useful Links : Processing-Online Processing-WebSite
Getting Started with Processing EzJS Editor IO Gui for Processing |
| Next Graded Assignment :
Dice Game Program
- 15 June at 18:00 |
Only 20 minutes today.
Find something fun to do - suggestions:
Exercise your brain with www.gamesforthebrain.com
Competitive Typing http://play.typeracer.com/
Something else?
Here are lots of THINKING games, to exercise your brain and creativity.
http://www.coolmath-games.com/1-logic-games
Try various games, searching for the most challenging and interesting.
Your Dice Game Project is due today at 18:00.
No, you may not turn it in late. If you are not finished,
you need to turn in the program that you have,
as it stands.
- Find the folder containing your program
- Right-click on the folder and choose "Compress"
- Upload the resulting .zip archive into Haiku
If you finish early, you may do some work for another class
or share your program with some other students.
Your project is due in 2 weeks, on 15 June.
Today is our last class before then.
If you have questions, try to ask them today.
Otherwise, you can come in to room 276 whenever
you don't have an exam and talk to Mr Mulkey (if he is there).
Otherwise, try sending an email.
Write a program in either JavaScript or Java to make
a
dice game, as described in these notes.
Be sure to ask questions if you are uncertain,
so that you get a good, productive start on the project.
Read these notes and do the practice exercises.
Here is a second version of the GUIDice program.
Quiz Tuesday - Open notes, using your computer,
fixing and improving a program with GUI components.
Here is a popular kids game called
MadLibs.
You can try it out once online.
Then download
this program, which is a first try
at a MadLibs game.
== Practice ==
- Add one more line to the [Adventure] story.
It could be "And Mary had a cat, too."
Your program some insert some word changes
in this new line.
- Create a story for the [Funny] button.
If you wish, you may take an idea from the madglibs web-site.
You probably need to add extra TextField boxes
to accommodate more changed words.
Notice that you can have EXTRA TextField boxes
in case they are needed for another story.
- Write a new problem that has several labels and TextField boxes.
Each label contains a question. The user must type an
answer
into the TextField that is next to each Label question.
Start with 3 questions and answers. If the user types
all 3 answers correctly, he WINS. If not, the computer
ERASES the contents of every incorrect answer box,
using a command like this:
answer2.setText("");
That replaces the text in [answer2] with NOTHING.
We have had too many problems with HTML,
so we will do some more work with Java.
The
sample above shows how to use a GUI IO library - for Buttons and such -
to write a Processing program with Java AWT GUI components.
The teacher will explain how this works and make suggestions
for useful changes.
This page outlines how the flow-of-control functions.
Homework:
Make the program better.
(1) Add a Button for subtraction, and one for division.
(2) Add a Button that displays a joke,
e.g.:
How many programmers does
it take to change a light bulb?
It doesn't matter - it's a
hardware problem.
(3) Add a Button that asks for a
password,
then tells whether it is correct or
not.
(4) Add a button to [Solve an equation].
When clicked, the user must type
the correct solution,
and the computer tells whether it
is correct.
(5) Add another math problem
button, then another, etc.


| apic.onmouseover = function() { apic.src = "button2.jpg" } apic.onmouseout = function() { apic.src = "button1.jpg" } apic.onclick = function() { location = "http://www.youtube.com" } |
In the example above, click on the [Atrium] box.
Then the arrow will move, hit the box and the box bounces.
The trick to making the coding easier is to make a FUNCTION
for each action. Then make a START function, which uses
setTimeout to start each action at the right time.
If you do this, then each individual action can be coded
with the times starting at ZERO - that is the ZERO time
for that specific function.
Here is the code for the ATRIUM.ONCLICK (the starting function):
|
atriumPic.onclick = function() // this is the
START { atriumMove(); setTimeout("arrowToBox();",9000); setTimeout("atriumBounce();",10100) setTimeout("gohome();",11000); } atriumMove = function() { Slide(arrow,30,350,50,300,800,0) setTimeout("Slide(arrow,50,300,250,275,1800,0)",1000) setTimeout("Slide(arrow,250,275,338,200,1800,0)",3000) setTimeout("Slide(arrow,338,200,338,80,1800,0)",5000) setTimeout("Slide(arrow,338,80,440,80,1800,0)",7000) } arrowToBox = function() { Slide(arrow,440,80,720,160,800); setTimeout("Zoom(arrow,1,1,40,40,0,0,300,0,0)",1000) } atriumBounce = function() { Slide(atriumPic,750,200,750,600,500); setTimeout("Slide(atriumPic,750,600,750,200,500);",700) } |
Below are a list of Rube Goldberg Machine ideas that turned
into projects that won a yearly contest. You may select
one of these ideas, or make up your own, as you wish.
Your assignment is to make a WEB-PAGE with a Rube Goldberg Machine.
There should be a [Start] button that starts a sequence of actions.
Each action will involve some object moving and touching another object -
then that will start the second object moving.
The best way to approach this is to start with one of the ideas below.
Make a web-page where that one single action happens.
THEN add the action that comes BEFORE that action, and triggers it to
start.
Then add another action before that, etc.
Keep It Reasonably Simple - BUT INTERESTING!
You are not expected to create something as complex as the little
boy in the video. This is due on the Friday after vacation, so you
have
less than 2 weeks to complete it (not counting vacation time).
As a rough estimate, you could expect to add one action per day,
so a total of 9 actions altogether. You do not need to make anything
more than that. If some of the actions are complex, like involving
an animation as well as movement, then you can make fewer than 9.
Totally realistic actions are quite difficult. For example, a hammer
hitting
a nail should actually have the hammer rotating. But you can keep it
simple
by having the hammer just move down and up.
How Much is Enough
Let's say that the finished page should contain 5-9 actions.
And don't make them last too long - about 10 seconds maximum
for each action.
Here are the suggested topics - but feel free to do something else:
| 2013 Hammer A Nail 2012 Inflate A Balloon and Pop It! 2011 Watering A Plant 2010 Dispense an Appropriate Amount of Hand Sanitizer into a Hand 2009 Replace an Incandescent Light Bulb with a More Energy Efficient Light Emitting Design 2008 Assemble a Hamburger 2007 Squeeze the Juice from an Orange 2006 Shred 5 Sheets of Paper 2005 Change Batteries and Turn on a 2-battery Flashlight 2004 Select, Mark and Cast an Election Ballot 2003 Select, Crush and Recycle and Empty Soft Drink Can 2002 Select, Raise and Wave a U.S. Flag 2001 Select, Clean and Peel an Apple 2000 Fill and Seal a Time Capsule with 20th Century Inventions 1999 Set a Golf Tee and Tee Up a Golf Ball 1998 Shut Off An Alarm Clock 1997 Insert and Then Play a CD Disc 1996 Put Coins in a Bank 1995 Turn on a Radio 1994 Make Cup of Coffee 1993 Screw a Light Bulb into a Socket 1992 Unlock a Combination Padlock 1991 Toast a Slice of Bread 1990 Put the Lid on a Ball Jar 1989 Sharpen a Pencil 1988 Adhere a Stamp to a Letter 1987 Put Toothpaste on a Toothbrush |
One Programming Trick
Notice that you will have a long sequence of setTimeout commands.
This is quite difficult if you try to do it in one long sequence of
commands.
The teacher will show you a better, more "scalable" approach on Thursday.
For today, just start making the final action.
1. Programming Quiz - write your solutions on paper and turn in
(20-30 min)
You may use any old programs or notes that
you find useful,
but do not communicate with other
students.
Web
Page Questions
2. Starting Rube Goldberg Machines (Homework)
- watch the Little
Kid Video
- try out the Trap-o-matic
Rube Goldberg Game
We can add a nice, pretty SLIDE SHOW to our school map.
This keeps the viewer's interest.
Look at this
example page - click the [Slide Show] button.
The slide-show is implemented by the following code:
| ............ <button id=slideShow style="position:absolute;left:100px;top:600px">Slide Show</button> <div id=showdiv style="position:absolute;left:300px;top:400px"></div> <script> Resize(showdiv, 400,300) photos = Array('photo1.jpg', 'photo2.jpg', 'photo3.jpg') slideShow.onclick = function() { Slideshow('showdiv', photos, 500, 2000) } .... the rest of the Javascript is down below .... |
You will notice some problems with the slide-show.
You should add a slide-show to your school map,
but improve it.
- get at least 5 pictures from Google images
- use a Graphics Editor to resize your images to a standard size,
for example 400x300 pixels. If the images are different
shapes,
then resize them to make them all the SAME HEIGHT,
and allow the widths to be different.
- Save all 5 pictures in the same folder with your school map web-page.
- Change the ARRAY command so that includes your 5 pictures.
- Place the SHOWDIVE in a better place, at the bottom-right
corner of the screen.
- Add the starter BUTTON to your page, and make sure it all works.
This
sample page contains an INVISIBLE DIV
that is placed directly over the Auditorium (#9).
The DIV is not actually invisible, but it contains no text
and has no background color, so you cannot see it.
But you CAN roll the mouse over it - that won't work with invisible divs.
This is done with .onmouseover and .onmouseout:
<div id=auditorium style="position:absolute;left:370px;top:100px;width:55px;height:45px;"></div> |
Add some more invisible divs over various items in the map.
We will look at ZOOM in a bit more detail:
- Book as PDF (ZOOM is chapter 6 #49)
Continue the assignment from yesterday - the animated/articulated school
map.
It's practice. If you succeed in adding one new item -
and that involves several changes - then add another item.
******* BUG ALERT *********
|
QUIZ - download this folder
When
you have finished the quiz, please read/watch about
the future of programming and about IB Computer Science.
Start with this web-page, then make some changes.
You can download the whole folder here.
Let's try to do the following:
- change the penguin's circular path:
- to continue 4 times around the circle
- to be an ellipse, that is wider than it is high
- change the bear's trip :
- to continue down to the bottom of the picture
and then back to the starting point, make a
triangle
- make the bear "dance" by switching pictures back and forth
- make the bear PAUSE for 5 seconds at each corner of the
triangle
- make the bear repeat the triangle several times
- add another object that just moves back and forth
across the bottom of the ice picture
- make one object that moves in an interesting path,
then touches another object, and then that
object moves in an interesting path.
For example, the first object moves in a circle,
ends up touching another object (top of circle)
and the second object moves in a circle in the
opposite direction
- Make more objects moving in TRAJECTORIES - practice!
*** Plan on an in-class programming quiz on Thu 12 Mar ***
Class is cancelled today, as the grade 10 students
are attending Career Day Presentations.
Senior student should plan on doing some work,
either for this class (Friday's assignment) or work
for another class.
We will start with this web-page, then make some changes.
You can download the whole folder here.
Let's try to do the following:
- change the penguin's circular path:
- to continue 4 times around the circle
- to be an ellipse, that is wider than it is high
- change the bear's trip :
- to continue down to the bottom of the picture
and then back to the starting point, make a
triangle
- make the bear "dance" by switching pictures back and forth
- make the bear PAUSE for 5 seconds at each corner of the
triangle
- make the bear repeat the triangle several times
- add another object that just moves back and forth
across the bottom of the ice picture
*** Plan on an in-class programming quiz on Thu 12 Mar ***
This
page shows the dancing bear animation
that is also moving (walking) at the same time.
Here is a .zip archive containing the WALKING file.
Continue making animations (as you started yesterday)
and add moving commands to some of them,
so they are animated and also moving.
Here is a solution to the assignment from last lesson:
Dancing
Bears
That probably won't run directly from the website - you can download it
here:
Dancing
Bears Zip
Now that you know how to write LOOPS that make animations,
practice by doing the following:
- make another animation, some other animal, that is dancing
- using a graphics editor, like ipiccy.com
,
- start with a small picture of an animal
- cut out pieces of the picture and move them
around,
like the arms
- save several different copies with the arms in
various positions - at least 4 pictures
- make an animation displaying your pictures, on
after another
- make another animation with even more pictures, and more things moving
Look at this
sample page
and then follow the instructions.
Continue with these
notes
working on practice exercises #8, 9, 10.
Remember you need PJ.js, all pictures
and your web-page in one single folder.
We
can make objects (probably pictures) slide around on a web-page.
Read
these notes for more
information.
**
Note that the sample programs will only work
** if you have the web-page,
the images (ex.gif
, oh.gif)
** and the PJ.js
library ALL STORED TOGETHER IN ONE FOLDER.
Practice
: Do #1,2,3,4,5,6,7 in the NOTES above
We are going to make an interactive multiple-choice quiz.
You have 3 days of class to do this - that should be
relatively easy, so you don't need to hurry too much.
Read these instructions and look at the sample quiz.
The quiz (with many pages) is DUE Tues 17 Feb at 9:30 am.
TO TURN IN YOUR MULTIPLE CHOICE QUIZ:
Make sure that all the web-pages and all the images
and IBIO.js are all in ONE SINGLE FOLDER.
Then COMPRESS the folder and UPLOAD the .ZIP file in Haiku.
Here is an ANIMATED Math Problem web-page.
You can download the page, but you must save it
inside a folder that contains IBIO.js - otherwise it won't work.
You will notice that a SPAN element has been written in HTML
rather than using the MAKE command. That is because
it contains an = sign, which messes up the MAKE function.
Open this file in KOMODO and do the following practice exercises:
(1) Add a nice TITLE at the top, in big text, using the H2 tag.
(2) Move all the Buttons and Input boxes down 50 pixels.
You must also move the SPAN tag down 50 pixelse.
(3) Add another fraction and 2 more buttons, to make this problem:
1
3 4
7
----- + ----- + -----
= ------
2
9
12 6
(4) Make a similar page, but with WORDS instead of numbers.
Each of the words in SQUARE BRACKETS below
corresponds to an INPUT object and a BUTTON
for the answer.
[Mary] had a
little [lamb]
Its [fleece] what
white as [snow]
And everywhere that
Mary [went]
The lamb was [sure]
to [go].
(5) Make up your own math problem or poem
and make a corresponding interactive web
page.
At the end, it must say "right" or "wrong".
Looking Ahead
Next week, we will look at a variety of LIBRARIES,
especially with GRAPHICS functions.
Using these will be easier with a standard editor.
So, before class on Monday, you should download
and install KOMODO from http://komodoide.com/download/
(choose Komodo Edit, not IDE)
(Faster download
from this server)
==== TODAY ====
Copy the program below and follow the instructions in the PRACTICE section.
You might find this list of color names useful:
http://www.w3schools.com/tags/ref_colornames.asp
| /////////////////////////////////////////////////////////////////////////// // This program makes a robot head. // It contains a SELECT list with color. // Choosing an item in the list changes // the color of the eyes. // // Notice that the program uses an extra BOUND function // for setting LEFT,TOP,WIDTH,HEIGHT. This makes it // easier to create new DIVs, because there is less // typing required - the BOUNDS function automatically // adds "px" to each number and assigns it to the // correct PROPERTY. This use of a FUNCTION is typical // of PROCEDURAL languages. It is not a typical // Object-Oriented-Programming technique, and // hence requires slightly different syntax: // using bounds(leftEye,110,70,30,30) // instead of leftEye.bounds(110,70,30,30) // // Also notice the SYNTAX of the make("select..) command. // The words for the list are entered like this: // Eyes|red|green|blue|orange // This is not standard Javascript or HTML, // but a convenience supplied by the IBIO.js library used in EzJS. ////////////////////////////////////////////////////////////////////////// make("select;left:100px;top:0px;id=eyes;Eyes|red|green|blue|orange"); eyes.onchange = function() { var c = eyes.value leftEye.style.background = c rightEye.style.background = c } make("div;id=head;left:100px;top:50px;width:100px;height:100px;background:pink") bounds = function(obj,l,t,w,h) { obj.style.position = "absolute" obj.style.left = l + "px" obj.style.top = t + "px" obj.style.width = w + "px" obj.style.height = h + "px" } make("div;id=leftEye;background:lime") bounds(leftEye,110,70,30,30) make("div;id=rightEye;background:lime") bounds(rightEye,160,70,30,30) make("div;id=mouth;background:purple") bounds(mouth,130,120,40,20) /************************************************************* * === PRACTICE === * * 1 - Add another SELECT list, with colors, that changes * the color of the MOUTH when clicked. * * 2 - Add more DIV objects to make the following: * - a body * - 2 arms * - 2 legs * Then add a COLOR list for each item, e.g.: * body color, arms color, legs color * * 3 - Make a BUTTON that can make one eye "wink", * by making it smaller (use bounds). * * 4 - Add a HIDE function - it looks like this: * * hide = function(obj) * { * obj.style.visibility = "hidden" * } * * Make a button that can hide the legs, by executing: * * hide(leftLeg); * hide(rightLeg); * * 5 - Make a corresponding SHOW function, using: * * obj.style.visbility = "visible" * * and add a BUTTON that makes the legs visible again. * ************************************************************/ |
Download this .zip file : EzJS with Animals
To make this work properly, you must open the EzJS.HTML page
that is in this folder, so that it can successfully find the picture.
Then copy the Ez code from the Animals.txt file.
The Animals page uses BUTTONS and DIVS to identify specific animals.
(1) Add another BUTTON for another animal -
the BUTTON should move orange box on top of the
animal
(2) Add another colored-div that appears on top of another animal.
(3) Change the buttons so that the orange box always
changes size to match the animal correctly.
(4) Add an IF command like the following:
if(this.style.backgroundColor == "")
{
this.innerHTML =
"<H1>ELEPHANT</H1>"
this.style.backgroundColor = "rgba(255, 0, 0, 0.2)"
}
else
{
this.innerHTML =
"";
this.style.backgroundColor = "";
}
Then the elephant box turns on and
off when you click.
(5) Make the Butterfly DIV turn on and off when you click.
(6) Now make a new page with a different picture,
where the picture has numerous
objects or people in it.
Add some locator buttons and some colored
DIVs.
Make sure you save the new picture in the
same folder
with the EzJS.html file.
We will discuss how objects and browser security function,
specifically in connection with this program:
| make("iframe;id=showPage;left:10px;top:100px;width:640px;height:480px") showPage.src = "https://www.bing.com" make("button;id=abc;innerHTML=ABC") make("button;id=spiegel;innerHTML=der Spiegel") make("button;id=bing;innerHTML=Bing Search") abc.onclick = function() { showPage.src = "http://www.abc.com" } spiegel.onclick = function() { showPage.src = "http://www.spiegel.de" } bing.onclick = function() { showPage.src = "http://www.bing.com" } //------------------------------------------------------------- make("img;id=world;left:250px;top:10px;width:64px;height:64px") world.src="http://icons.iconarchive.com/icons/BogdanGC/layered-system/128/globe-icon.png" make("img;id=friday;left:350px;top:10px;width:64px;height:64px") friday.src="http://allsteelefitness.com/wp-content/uploads/2014/03/friday18.jpg" world.onclick = function() { showPage.src = "http://cdn.shopify.com/s/files/1/0188/1978/products/world_map_940x627px_dark_bl_large.jpg?v=1377278248" } friday.onclick = function() { showPage.src = "https://www.youtube.com/embed/kfVsfOSbJY0" } |
You can escape the http vs https annoyance by downloading EzJS
and running it from the local hard-disk. This also has the advantage
that you can put image files into the local EzJS folder,
and then include them EzJS web-pages. Here is a downloadable
version:
Here is an EzJS program that has 4 buttons,
which link to pictures, web-sites and videos:
| make("button;id=clown;innerHTML=Happy
Clown") make("button;id=frogs;innerHTML=Ugly Frogs") make("button;id=crash;innerHTML=Chair Crash;left:40px;top:60px") make("button;id=big;innerHTML=Big Video;left:200px;top:10px;width:200px;height:100px;") clown.onclick = function() { open("http://www.shoutwiki.com/w/images/en.barneybunch/5/55/Ronald.jpg") } frogs.onclick = function() { open("http://www.free-extras.com/tags/1/ugly+frog.htm") } crash.onclick = function() { open("https://www.youtube.com/watch?v=BQJtV_YLuNE") } big.onclick = function() { open("https://www.youtube.com/embed/BIWeEFV59d4?start=25") } |
There is not too much mysterious about these commands,
but the teacher will present a brief explanation.
== Practice ==
Now add the following code that clicks-through 3 pictures:
You will need to TYPE this code - you cannot copy and paste.
== More practice ==
3. Check that your code works properly and clicks through
3 evil clown pictures when you click on the
image.
4. Add another picture to the "stack". You will need to make
several changes in the code to make 4 pictures
work.
|
We will be using Javascript to create Web-Pages. We will start by using a simplified JS editor, |
 |
Here is a simple program with 3 buttons,
using ALERT and PROMPT and IF..
| make("button;id=riddle;left:100px;top:50px;innerHTML=Elephant
riddle") riddle.onclick = function() { alert("Why are elephants fat?") alert("from eating too many marshmallows") } make("button;id=haiku;left:200px;top:50px;innerHTML=Haiku poem") haiku.onclick = function() { alert("To err is human \n but to really foul things up \n use a computer") } make("button;id=math;left:150px;top:100px;innerHTML=Math problem") math.onclick = function() { guess = prompt("Add up : 1+3+5+7+9+11+13+15+17+19") if(guess == 100) { alert("RIGHT!") } else { alert("..no, try again..") } } |
| Copy the code into EzJS. Then add more buttons - riddles, poems, math questions, anything else you can think of. |
 |
Download this program :
https://dl.dropboxusercontent.com/u/275979/graphics/Greenfoot/BabyCatcher.gfar
Do your quiz and turn it in (on paper).
== Javascript ==
Here is a simplified Javascript editor:
https://dl.dropboxusercontent.com/u/275979/ibcomp/webScience/javascript/jsLessons/EzJS.html
It has sample programs in [Samples],
with instructions for practice exercises.
Start with a simple program (near the top)
and do what the instructions say.
You will notice the Javascript looks very much
like Java, but ; semicolons are not required.
There are some other things that are simpler,
like no need to write "int" or "String" when
you create a variable.
If you have something else to do (math homework?)
you can do that instead. We will start learning
Javascript seriously on Friday.
Download this Bouncer program
Answer these questions about Bouncer
Your quiz tomorrow will be similar to the questions above -
you will use Greenfoot to INSPECT a program, and
then answer questions ON PAPER.
Reminder - Quiz on Wednesday
Download this .gfar file : Frogger.gfar
Do the practice tasks listed below (in any order you like).
Download this SonicLevel4 program.
Adding a new Animated Gif
You can add a new Animated Gif to your project.
Use a relatively small gif image, under 200 pixels.
1- download the animated .gif file, e.g. runner.gif
and save it into the project folder, in the [images]
sub-folder
2 - create a new Turtle sub-class, e.g. Runner
3 - include the following code in your Runner class:
public Runner()
{
setImage("runner.gif");
// any other
code here
}
public void act()
{
super.act();
// movement code here
}
Now you can use your new Turtle as normal,
and it will appear as an animation.
Adding Another Level
You can add another level to the game, for example [Level5].
You should "insert" this, so that [Level4] starts [Level5] when it
finishes.
And then Level5 should start [Ending] when it finishes.
Today's Practice
1 - Play the game until you understand how it is played.
2 - Inspect the code until you understand how it works.
Especially find out how to detect collisions.
3 - Find a new animated GIF online (search in Google).
Then create a new Turtle sub-class that uses
this .gif image.
4 - Add a copy of your new Turtle object into one of the levels.
5 - Add a new [Level5]. Create this as you wish,
but use your new Turtle object, along with
others.
It should include all the following:
- [Level5] should start when [Level4] finishes
- use the mouseClick to control your new
character
- make the goal to have your player collide
with something else
- when finished, [Level5] should jump to
[Ending]
6 - If you finish early, add another level .gif animation and
another level for practice.
Download this SONIC program and open it in Greenfoot.
When it is running, you need to:
- compile all
- make a new [TurtleWorld] - don't start at Level 1 or Level 2
Add more worlds (levels) and more classes (objects)
so it's possible to click from one level to another to another,
and possible to go to all the levels. You will need to add
more Turtle Actors and objects to make this work.
Make all your Turtle Actors move, otherwise it is boring.
Try to make another one like sonic, that moves around
the edges of the screen, maybe in the other direction.
Make some Turtle Actors that move back and forth,
or up and down, like the dolphin.
If you want to add an animated GIF, you must IMPORT
that into the Images library.
The students who did not complete the quiz on Friday
will have another chance today.
Students who are not working on a quiz should INVESTIGATE
the following Greenfoot programs (investigate means to
run the program, read the code, make small changes in the code,
until you understand how the programs work and what the code means).
Find new commands that do something interesting, then try
changing the commands to figure out how they work.
You will need to [Open in Greenfoot] to download each program.
Investigate
Open this project : http://www.greenfoot.org/scenarios/690
- Find out how to make a mouse-rollover that changes the
color of some text.
Open this project : http://www.greenfoot.org/scenarios/2683
- Find out how to make sound effects.
Open this project : http://www.greenfoot.org/scenarios/5432
- Find out how to shoot a bullet
Open this project : http://www.greenfoot.org/scenarios/5314
- Find out how to drag-and-drop
an object while the program is running
Open this project : http://www.greenfoot.org/scenarios/1015
- Find out how to make objects bounce off of each other
when they collide.
You might also find this page helpful : http://www.greenfoot.org/doc
You must finish your quiz and show the running program to the teacher.
You may only work for a maximum of 30 minutes on your quiz.
After finishing, go to the main Greenfoot web-site:
http://www.greenfoot.org/scenarios
Find an interesting "scenario" (program).
Click the [Open in Greenfoot] button
to download the program and run it.
Investigate the program. Look at the source code
for each actor. Try to make small changes that
you understand and that work correctly.
Take notes about what you found out,
and we will have a class discussion on Tuesday.
Download this scenario (program): LTA
If you run it, you can use left and right arrows to steer the car.
Reminder - QUIZ TOMORROW.
During the quiz, you may use your computer and any notes or
old programs you find useful (including web-sites).
You will receive a starting program, and you must follow instructions
to change/improve the program. The teacher will check your
program when you are finished.
Download the Greenfoot Scenario (program):
https://dl.dropboxusercontent.com/u/275979/graphics/Greenfoot/redcircles.zip
Unzip this archive and then open it in Greenfoot.
This contains 3 different "TurtleWorlds".
You can choose which program you wish to see
by right-clicking on the "world", then choose [New TurtleWorld].
There are 3 different worlds. Try out each one.
Then do the practice described below.
1. Red-circles Fresnel Interference
2. Spirals
3. Squares
4. Your World
Here are some notes about Greenfoot:
https://dl.dropboxusercontent.com/u/275979/graphics/Greenfoot/TurtleShapes%202/index.html
http://dl.dropboxusercontent.com/u/239179/graphics/GreenFoot/GreenfootNotes.html
To start with Greenfoot, try out the Lunar Lander Scenario.
It is in the Greenfoot/Scenarios folder.
You might also wish to download the following scenario and INVESTIGATE
it.
Trick-The-Turtle
To download the scenario, click on [Open in Greenfoot].
Then you need to EXTRACT the archive file,
and open the folder in Greenfoot.
Here are some notes for a first practice assignment involving Turtle
Graphics.
https://dl.dropboxusercontent.com/u/239179/graphics/GreenFoot/TurtleShapes.html
In Processing, click on File/Examples.
Open Topics/Motion/Reflection2.
This program contains an ORB that falls and bounces off the ground.
The ground is irregular, randomly tipping up and down.
So the ball bounces off in unpredictable ways.
Make changes to do any of the following - or anything else you find interesting.
Copy this program and do the practice exercises at the bottom.
Remember you have a test on Monday - about using ARRAYS.
Be sure to bring a working computer - you will need it.
Load this program and do the exercises at the bottom.
A famous word game is called Mad Libs.
Players choose "random" words and these are
placed into blanks in a story. Then the story
is usually funny, because the words don't fit.
You can try it on this web-site:
http://www.eduplace.com/tales/
Here
is a Java program that does something similar.
Copy this program into Processing, then do the
practice exercises.
Read these notes and do the Practice excercises.
Here is a version of JigsawPuzzle that uses ARRAYS to store the pictures,
and then uses LOOPS for all of the commands.
The teacher will explain how to use Loops and Arrays sensibly.
== Practice ==
Download the program above.
FINISH the CHECK method, so that it checks ALL pieces
before displaying "Finished".
To make sure that only one piece moves at a time,
you need to change the keyPressed method like this:
| void mousePressed() { tryDrag(clown); tryDrag(dog); } void tryDrag(DragImage im) { if(!clown.dragging && !dog.dragging) { im.clicked(mouseX,mouseY); } } |
If you have more than 2 puzzle pieces, then the IF(..) command
will be longer, with one item for each piece.
If you already finished your puzzle from yesterday,
you can make it better by splitting a large piece
into two smaller pieces.
The teacher will show how to "snap together" pieces,
so the puzzle can be solved without moving the mouse
to the exact single correct pixel. This is tricky, but only
requires some small changes to the DrawImage library.
| // Stop dragging void stopped() { if(dragging) { snapped(); dragging = false; } } void snapped() { float sx = (float)Math.floor(x / 40)*40; float sy = (float)Math.floor(y / 40)*40; x = sx; y = sy; } |
=== Second Practice ===
Now if you have a puzzle with 8 square pieces,
it is quite easy to solve. To make it more challenging,
you can make more pieces in a variety of sizes.
Since "snapping" into position requires standard measurements,
you must be sure that all the pieces are "standard", like
a multiple of 40 pixels. It could look like this:
If your whole picture isn't an exact multiple of 40 (in each direction),
you can either resize the image before chopping it up,
or leave off some of the edges. Now chop up another picture,
but this time make pieces of various sizes. Then make the "snap"
changes in DragImage and check that your puzzle is solvable.
Try out this Jigsaw Puzzle.
Then download this Click-and-Drag Processing program.
Finish your interactive picture and turn it in.
You need to:
- compress the FOLDER containing your program
- upload the .zip archive in Haiku
Continue making your attractive, interactive picture (due tomorrow).
Continue making your attractive, interactive picture.
You might wish to save copies of your picture(s) in graphics files.
You can save a copy of your picture to a graphics file
on the disk (in the sketch folder) like this:
| int picnum = 0; void mouseClicked() { picnum = picnum + 1; save("gradfill"+picnum+".jpg"); } |
== Assignment ==
DUE DATE = Thursday 27 Nov at 18:00
Make an ATTRACTIVE and INTERESTING interactive picture,
using pixel-color changes and any other effects you wish.
DON'T use the Mountain Goat picture from the examples -
choose some other image.
Spend time trying out various ideas, as well as various pictures.
Here
is one more idea for pixel-oriented color change -
a "Gradient Fill". It changes the color shading gradually,
one pixel at a time from top to bottom.

| PImage
img,img2; void setup() { size(600, 450); img = loadImage("http://images.nationalgeographic.com/wpf/media-live/photos/000/006/cache/mountain-goat_635_600x450.jpg"); img2 = createImage(img.width, img.height, RGB); } void draw() { for (int y = 0; y < img.height; y++) { for (int x = 0; x < img.width; x++) { int p = y*img.width + x; // pixel position color c = img.pixels[p]; float r = red(c); float g = green(c); float b = blue(c); b = b * (y/200.0) ; r = r * ((400-y)/100.0); if(mouseY < 2*g) { g = g - mouseY/2; } img2.pixels[p] = color(r,g,b); } } img2.updatePixels(); image(img2, 0 , 0); // saves entire picture into a file on disk } void mouseClicked() { save("gradfill.jpg"); } |
Copy the text into Processing, and then
make the changes described at the bottom.
| PImage img,img2; void setup() { size(600, 450); img = loadImage("http://images.nationalgeographic.com/wpf/media-live/photos/000/006/cache/mountain-goat_635_600x450.jpg"); img2 = createImage(img.width, img.height, RGB); noLoop(); } void draw() { for (int y = 0; y < img.height; y++) { for (int x = 0; x < img.width; x++) { int p = y*img.width + x; // pixel position color c = img.pixels[p]; float r = red(c); float g = green(c); float b = blue(c); //====== Here are the effects ====== if(x < 200) { r = 255; } else if(x >= 200 && x < 400) { r = r/2; // this removes half of the red b = b/2; // and half of the blue // the result looks green } else { b = b*3; } //====== end of EFFECTS section ======= img2.pixels[p] = color(r,g,b); } } img2.updatePixels(); image(img2, 0 , 0); save("stripes.jpg"); } /********************************************** (1) Try applying different effects to the 3 sections. (2) Change the IF.. commands to make 6 stripes instead of just 3 stripes. (3) Change the IF.. commands so the stripes are horizontal instead of vertical. That means you check the Y value instead of checking the X value. You need to use different numbers for Y, because the picture is not as large up and down as it is across. (4) Try writing "x+y" instead of "y". This will make diagonal stripes. (5) Try writing "2*x-y" instead of "y" (or whatever you have.) (6) Try various COEFFICIENTS, like 2.5*x - 1.2*y **********************************************/ |
Download
pixels ver 2
Make the changes and improvements described by the teacher.
== PRACTICE ==
(1) Try changing the calculations in the CHANGE method
to produce some other interesting effects.
(2) Add a couple more words at the bottom of the screen,
and make the picture change when you roll-over
these new words - use different, interesting
effects.
Today we will be manipulating lots of PIXELS .
Here is a simple example program:
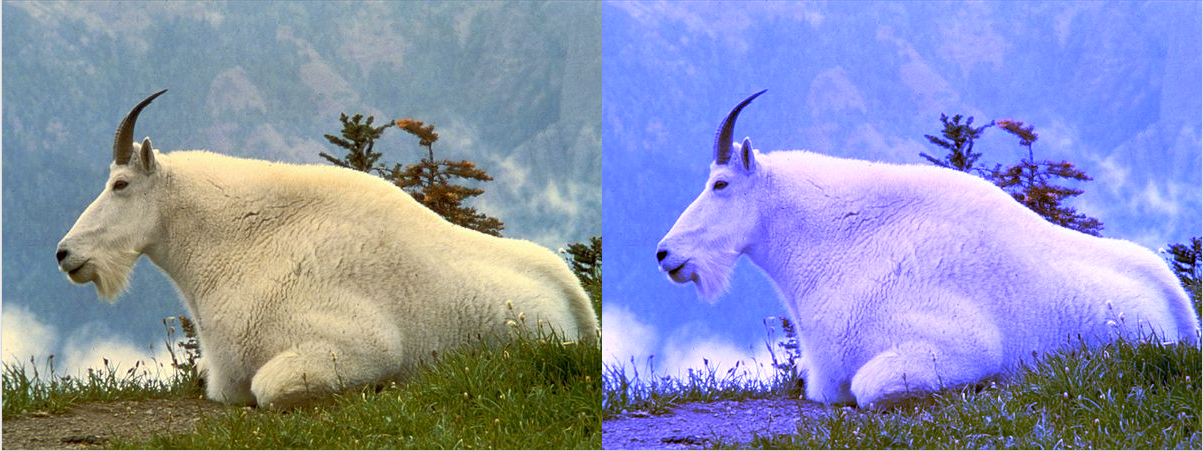
| PImage
img; void setup() { size(1200, 500); img = loadImage("http://images.nationalgeographic.com/wpf/media-live/photos/000/006/cache/mountain-goat_635_600x450.jpg"); // Load the original image noLoop(); } void draw() { image(img, 0, 0); // Displays the image from point (0,0) img.loadPixels(); PImage newImg = createImage(img.width, img.height, RGB); for (int y = 0; y < img.height; y++) { for (int x = 0; x < img.width; x++) { color p = img.pixels[y*img.width+x]; float r = red(p); float g = green(p); float b = blue(p); b = b*4 ; newImg.pixels[y*img.width + x] = color(r,g,b); } } newImg.updatePixels(); // puts pixels array back into the image image(newImg, width/2, 0); // Draw the new image } |
Today you need to turn in your finished game.
Finished does not mean "perfect" - but it should be mostly working.
To turn in your game, you need to:
If you need a bit more time, you may turn in the game any time today
before 21:00.
But you must still do the description page, and it must be written after
the game is finished.
Download this sample multi-level game : Levels.zip
You might wish to study these notes that presentOn 11 Nov, you should bring a finished program to class with you.
You will spend the period writing a description of the game -
don't plan on finishing the game during that class.
To turn in the game, you need to:
Download this program : collector.zip
The teacher will explain how ARRAYS work.(1) Open the program and check that it works properly.
(2) Add 5 more bugs - now it is easier to win.
(3) Take away the middle bomb.
This may cause an error in another part of the
program.
You need to change the BOMBS ARRAY so it only has
4 items.
(4) Add another ARRAY (collection) of objects -
maybe 3 stars that are worth 200 points each.
(5) Add another key - K - that kills one of the bombs -
you can do this with something like
bombs[2].hide();
(6) Use a loop to .hide ALL the bombs, not just one.
(7) Make another object that moves around the screen,
and give 300 points if the user touches it.
(8) Change the random positions of the bugs so that they
are all over the entire screen.
(9) Make any other changes that you can think of.
Suggestion - when there are lots of objects,
you should keep them pretty small.
Keyboards are not well designed for 2-player games.
If you hold a key down, you can lock the other player out -
until he/she releases their key and presses it again.
Forcing players to release their key(s) is the best strategy.
So instead of using if(keyPressed) inside the draw()
method,
we make an extra method for keyReleased :
| void keyReleased() { if(keyCode==UP && player.y > 10) // use KEYCODE for control keys { player.move(0,-10); } if(keyCode==DOWN && player.y < 500) { player.move(0,10); } if(key == 32) // use KEY for normal letters { cookie.show(); cookie.place(player.x+40 , player.y); cookie.setSpeed(35,0); } if(key == 'q') { rat.place((int)random(400)+300,500); // random jump } } |
Here is a 2-player game with gravity, bullets and bouncing.
https://dl.dropboxusercontent.com/u/275979/graphics/processingGraphicsTutorial/GravityBullets2.zip
Work with a partner to make a better 2-player game.
Download and unpack this .zip archive: Gravity and Bullets
The program demonstrates how to create GRAVITY.
The cookie "bullet" and the bouncing boy follow
the law of gravity. Try the game - you need to
hit the rat 5 times and hit the bouncing boy as well.
Press the SHIFT key to fire a cookie bullet.
The teacher will explain how GRAVITY works in a video game.
== Practice ==
(1) Download the program, play the game a couple times.
(2) Change GRAVITY to make it stronger, so the cookie
falls more quickly.
(3) Make a different player.
Put this player on the RIGHT side of the
screen.
Make the cookie fly to the LEFT instead
of the right.
Move the bouncing boy so he is on the
LEFT side.
(4) Make a new plane that flies across the top of the screen.
It should bounce off of the edges and go
back in the other direction.
When the player presses the CONTROL
(command) key,
the plane should drop a
"bomb". This could be another
cookie if you wish. Keep both
the first player and the plane.
It should be possible to shoot a
bullet and drop a bomb
so they are both flying at the same
time.
Read
these notes about TIMER VARIABLES
and do the practice exercises.
Read these notes about background images.
We will make a list of clever ideas and requests.
For example:
- How can I make a scrolling background?
- How can I make a "bullet" that goes from the player to a target?
etc.
Exchange games with another student.
Run their game. Figure out how it works.
Then read their JAVA CODE, looking for:
- clever ideas that you didn't know
- commands or ideas that you don't understands
Bring a list of clever ideas and questions/requests
to class tomorrow.
Finish your Sprites Game Project. Today is the last class period
to work on your video game. It is due at 12:30 tomorrow.
Here is a more interesting example game: CookieMonsterB
The monster is bouncing off the walls, moving diagonally,
making the game a bit more challenging.
Remember - don't use any of the sample images in your project.
Your assignment (project) is to create a Video Game
using the Sprites library in Processing. Read the following
notes and design the game according to the requirements.
---> Sprites
Game Assignment
We will look at how to add more animated Sprites.
You can find lots of GIF animations at : http://www.animatedgif.net/
Read these notes about using Sprites for games
If you finish early, and you have uploaded your project into Haiku,
you can exercise your brain with some of these Brain Games:
http://www.gamesforthebrain.com/
Here is a sample program:
PImage
pic,smile; // this must include one variable for
each picture |
For SENIORS only :
Use PIZAP to make a funny picture, or
investigate some of the tools on this page:
http://www.hongkiat.com/blog/25-websites-to-have-fun-with-your-photos/
If you use a face, it must be YOUR face or a famous person from Google
Images.
You are NOT ALLOWED to use a photo of a friend or someone at FIS.
Make some funny pages, print them and hang them on the bulletin board(s) in 276.
Processing
can load and display images (pictures), like these 3 images:

Here
is the program that draws the picture above:
| PImage img1 , img2, img3; // this
must include one variable for each picture void setup() { size(600, 400); img1 = loadImage("http://sunnysideprimaryacademy.org/wp-content/uploads/2013/05/clown.png"); img2 = loadImage("http://static.guim.co.uk/sys-images/Guardian/Pix/pictures/2012/6/4/1338797575737/Staffordshire-bull-terrie-008.jpg"); img3 = loadImage("http://images1.wikia.nocookie.net/__cb20090329034449/simpsons/images/e/e5/Krusty_The_Clown.png"); } void draw() { background(250,180,250); // background color = pink image(img1, 0, 0,300,300); // draws the image on the screen image(img2, 320,200,300,200); // image(variable,x,y,width,height) image(img3, 250,140,150,200); } |
After trip week, we will use pictures and GIF animations to make a video game.
Learn to write METHODS to draw lots of copies of a picture.
Read these notes about methods.
Quiz on Basic Drawing Skills
If you finish the quiz early, look through the EXAMPLES (in the File
menu)
in processing and find a program that does something interesting.
Try changing some of the numbers in the program and see what happens.
Test Tomorrow (reminder) -
Tomorrow (Friday) you will have a test. It will be designed
for about 40 minutes.
You will receive a starting program and instructions. You must fix
the program
as described and then answer some questions on paper. Be sure to
bring
a working computer and a pen for writing your answers. During the
test
you may use any notes, web-sites, or old programs that you wrote.
Today
| The teacher will explain briefly how to use the CURVE
command. For example: stroke(0,0,255); strokeWeight(5); size(400,400); curve(0,0,100,200,200,200,300,0); |
We will start drawing some faces.
Read
these
notes and do the practice exercises #1-11,
stopping when it says "End of First Lesson".
Finish these notes.
We will be drawing CIRCLES and ARCS.
Read these
notes.
Finish the Olympic Rings today and
start working on the RUNNER.
Continue with these notes.
We will discuss how to make the Sweden flag and how to start the Israel flag,
|
Welcome to Graphics
Programming Bring Your Computer Every Day Each student needs a computer for class every day .. more .. |
 |
Here are some examples of Rube Goldberg Machines.
Trap-o-matic Rube Goldberg Game