Download program here : timerAnimation.zip
Visual Basic displays images, but not .GIF animations. To display an animation in VB, you need to chop a .GIF animation into individual frames, paste these into the VB program as separate images, and then display those images one after the other.
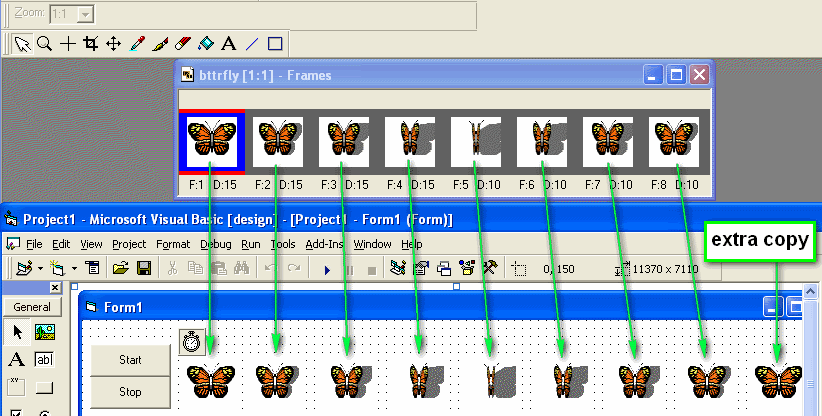
The images must be stored in a control array - for example horse(0), horse(1), horse(2) ... horse(16). Then the program must copy frames, one after another, into a single image control. Then it looks like that control is displaying an animation.
There is not pre-defined way to do this, but the following program presents one fairly simple methodology.
The butterfly is a simple animation made of 8 frames. The green monster is also a simple animation, but the program can move the monster around, from left to right on the screen. The unicorn (horse) is an animation that moves by itself across the screen and then back to the starting point. (The Visual Basic program runs a lot smoother than the movie clip above).
The first step is to open a .GIF animation in the Animation Workshop.
Make
an image array in visual basic, so you have pic(0) , pic(1) , pic(2)
.... pic(8)
Copy each frame of the animation into a separate image in the
image array.
You will need one extra frame, because pic(0) is only used for
display. The others are used for storage.
The storage images
(1..8) will be invisible when the program runs.
The program is available for download here: timerAnimation.zip
In each image, set the TAG property to the number of the next image. So in pic(2), set the TAG to 3. In pic(3), set the TAG to 4.
To make the image "loop" (repeat), set the TAG in pic(8) to 1, so that after pic(8) it goes back to pic(1).
Now there is no "automatic" or "built-in" mechanism for producing the animation. It requires some special code to make it run.
First you need a Timer control. This is a little clock that ticks
at a specific speed, executing some code at each tick.
The program runs the
timer 10 times per second. At each tick, it displays the next frame of
the animation -
so 10 frames per second. After placing your timer control,
you need to set the time Interval = 100 milliseconds.
Now the timer will tick 10 times per second. Then the following code will make the animation run:
Private Sub Timer1_Timer()
t = pic(0).Tag
n = pic(t).Tag
pic(0)= pic(pic(0).Tag)
pic(0).Tag = n
End Sub
This works because the TAG property in each image contains the number of the next frame to display.
That makes a very short, simple example program. The program shown
in the video is more complicated,
containing methods (subs) to start and
stop animations and a few other things. Your teacher will
explain
the sample program in greater detail - download it here: timerAnimation.zip
Download the sample program. Change it as follows:
(1) Change the butterfly to display a different animation - get a .gif animation from the web and copy the frames into the bf() array.
(2) Change the TAG numbers in the creature to make him run backward. DON'T change the images. Instead, the TAG numbers should say : 8,7,6,5,4,3,2,1 instead of 1,2,3,4,5,6,7,8.
(3) Change the unicorn (horse) so that he doesn't stop at position 8000, but rather stops at position 4000.
(4) Add one more new animation. You will need to make all the image controls, copy frames from the animation workshop, ands set all the TAGs correctly. You also need to make some changes in the program code to make the animation run.
(5) Make buttons to move your new animation up and down on the screen.