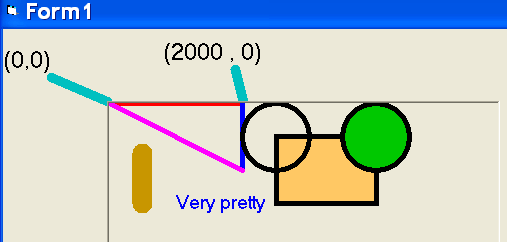
All drawing commands start with the name of the Picture
Box where the drawing will happen.
In all these examples, PIC is the name
of the Picture Box.

-- Coordinates --
Each position (point) on the screen is defined by two
number - X and Y.
The top-left corner of the screen is (0,0).
Move across
the screen by increasing the first number, X, like (2000,0).
Move down
the screen by increasing the second number, Y, like (2000,1000).

Keep in mind that the coordinates start at the corner of the Picture Box, not the corner of the screen.
-- Colors --
Colors are created from Red,
Green, and Blue components. These can be
mixed in various amount
to create other colors. The maximum value for
each component is 255.
Use the .ForeColor
command to set the drawing color. The following commands
draw three
lines - Red, Blue, and Purple.
     pic.ForeColor = RGB(255, 0, 0)
     pic.Line (0, 0)-(2000, 0)
     pic.ForeColor = RGB(0, 0, 255)
     pic.Line (2000, 0)-(2000, 1000)
     pic.ForeColor = RGB(255, 0, 255)
     pic.Line (2000, 1000)-(0, 0)
Lines
Normally lines go from one point to another,
as shown above. Be sure to use two numbers for each end,
and
put each end in (parentheses), and a dash - between the points.
-- Boxes --
You can use the line command to draw boxes (rectangles). Put two command and a B at the end:
pic.ForeColor = RGB(0, 0, 0)
pic.Line (2500, 500)-(4000, 1500), , B

Then add F at the end if you want to FILL
IN the box. But you will need to set the FillColor and the
FillStyle
before using this command, like this:
     pic.ForeColor = RGB(0, 0, 0)
     pic.FillColor = RGB(255, 200, 100)
     pic.FillStyle = 0
     pic.Line (2500, 500)-(4000, 1500), , BF

Notice that the ForeColor tells the color
of the edges (black), while the FillColor
tells the inside color (orange).
-- Circles --
The .Circle command draws a circle. You
must tell where the center of the circle is,
as well as its radius:
.Circle (centerX, centerY) , radius.
It is also filled in if you previously set the FillStyle = 0. Like this:
pic.FillColor = RGB(0, 200, 0)
pic.Circle (4000, 500), 500

-- Empty Circle --
To draw a circle that is not filled in, use .FillStyle = 1.
pic.FillStyle = 1
pic.Circle (2500, 500), 500

Notice that each drawing goes
on top of all the previous drawings.
The
green circle was drawn after
the box, so it covers up part of the box.
The empty circle also covers up
part of the box, but it is not filled in
so that part does not cover anything.
-- Fat Lines --
All the lines above are thicker than normal. Set
the thickness of the lines with .DrawWidth = 5,
or
even more for really fat lines, like this to make a fat, gold line:
pic.DrawWidth = 20
pic.ForeColor = RGB(200, 150, 0)
pic.Line (500, 750)-(500, 1500)
*
-- Printing Text --
You can use the .print command to print text in the picture box.
But first you need to move the cursor to the correct spot, before printing.
You might also want to set the font-size and the color, like this:
     pic.CurrentX = 1000
     pic.CurrentY = 1300
     pic.ForeColor = RGB(0, 0, 250)
     pic.FontSize = 16
     pic.Print "Very pretty"

--------------------------------------------------------------------------------------
The entire set of commands for above looks like this:
      pic.DrawWidth = 5
     pic.ForeColor = RGB(255, 0, 0)
pic.Line (0, 0)-(2000, 0)
     pic.ForeColor = RGB(0, 0, 255)
     pic.Line (2000, 0)-(2000, 1000)
     pic.ForeColor = RGB(255, 0, 255)
     pic.Line (2000, 1000)-(0, 0)
     pic.ForeColor = RGB(0, 0, 0)
     pic.FillColor = RGB(255, 200, 100)
     pic.FillStyle = 0
     pic.Line (2500, 500)-(4000, 1500), , B
     pic.FillColor = RGB(0, 200, 0)
     pic.Circle (4000, 500), 500
     pic.FillStyle = 1
     pic.Circle (2500, 500), 500
     pic.DrawWidth = 20
     pic.ForeColor = RGB(200, 150, 0)
     pic.Line (500, 750)-(500, 1500)
     pic.CurrentX = 1000
     pic.CurrentY = 1300
     pic.ForeColor = RGB(0, 0, 250)
     pic.FontSize = 16
     pic.Print "Very pretty"