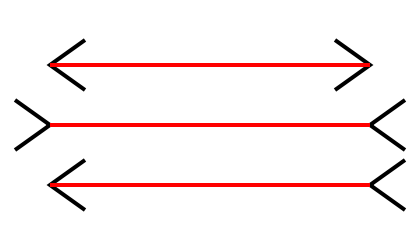
Illusions Test - 27 May 2019Download this starting program: Make all the changes listed on the test page. Then UPLOAD your program into Haiku. You must finish by 13:15. If you have problems uploading, then you may show the running program to the teacher and have it graded immediately. Practice with Illusions - 24 May 2019Download this starting program: == Practice == (1) In First - add two ears, shaped like ellipses - add eyebrows by adding a thick black line above each eye (2) In Second - Change the gradient fill to have green at the top and yellow at the bottom (3) In Third - change the strip of boxes to be vertical - up and down (4) In Fourth - change to 10 rows with 12 circles in each row - change the random commands to make darker colors (5) In Fifth - change it to make this picture (with text): (6) In Sixth - add 2 more boards (6 left ends and 5 right ends) *** Reminder ****************************************** Programming Test on Monday 27 May. You will be changing an existing program. You may use any notes that you wish to bring as well as any old programs that you wrote. ********************************************************** Morphing Lines - 21-22 May 2019Below is an example program that morphs lines to another set of lines. The teacher will explain how it works. You should make some changes: 1. Change FIRST so that it draws a 5 line house (a square with an A-frame roof) and SECOND so it is an upside down house with 5 lines. 2. Change FIRST and SECOND to make 2 different 2 letter words, like UP and OX. 3. Make a single letter A and a single letter Z, but make them in the same space, so the transformation happens in one space. 4. Make a stick man with outstretched arms and change to a stick man with the arms stretched up in the air. The legs should start out spread a part and the second with the legs closer together. /******************************************************************\ int[] first = { 150,100,100,100,100,200,150,200,-1,-1, 180,200,220,120,260,200,260,200,260,200,-1,-1, 300,120,380,120,340,120,340,200,340,200,340,200 }; int[] second = { 200,250,260,300,200,350,200,250,-1,-1, 300,250,360,250,356,350,300,350,300,250,-1,-1, 460,250,400,250,400,350,460,350,460,300,420,300 }; void setup() { size(600,600); textFont(createFont("Arial",32)); } int count = -1; int start = -1; boolean running = false; void draw() { background(255,255,255); stroke(0,0,0); strokeWeight(2); fill(0,0,0); text("Start Move End",100,30); if(mouseX < 220) { running = false; count = 0; } else if(mouseX > 400) { running = false; count = 120; } else if( mouseX > 260 && mouseX < 320 && mouseY < 40) { if(running==false) { start = frameCount; } running = true; if(count<120) { count = count+1; } else { count = 0;} } else { running = false; } for(int c = 0; c < first.length-2; c=c+2) { float d = count / 120.0; int x1 = first[c]; int y1 = first[c+1]; int x2 = first[c+2]; int y2 = first[c+3]; int x3 = second[c]; int y3 = second[c+1]; int x4 = second[c+2]; int y4 = second[c+3]; if(x1>=0 && y1>=0 && x2>=0 && y2>=0 && x3>=0 && y3>=0 && x4>=0 && y4>=0) { float x5 = d*x3 + (1-d)*x1; float y5 = d*y3 + (1-d)*y1; float x6 = d*x4 + (1-d)*x2; float y6 = d*y4 + (1-d)*y2; line(x5,y5,x6,y6); } } } \***********************************************************/ Morphing and Tweening - 20 May 2019This week we will explore a few more graphical "tricks". Then we will have an in-class programming quiz next Monday, where you will need to change/fix a program during class. Morphing Morphing is a process which gradually and smoothly changes one image into a different one. Here is an example: We can use https://creaceed.com/morphage to experiment with morphing. We can also do this with text: Tomorrow we will do some experiments with morphing text. More Optical Illusions - 16 May 2019Here is a program that draws some of the illusions from last class: Here are a few more optical illusions that can be drawn with loops. Choose an image and write a program that uses loops to draw it. Then do another image. This is made with 3 different parallelograms of different colors. 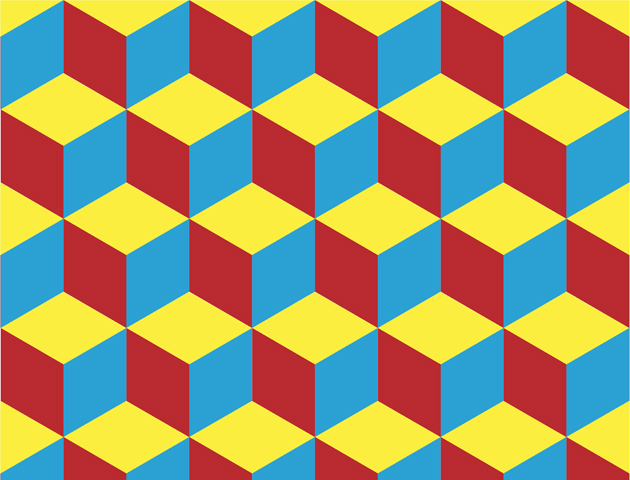 The code is a good first try for the cubes above. You need to change it to make it correct: /=================================================\ void setup() { size(600,600); } void draw() { background(0); noStroke(); for(int y=100; y<600; y = y+100) { for(int x=100; x<600; x=x+100) { cube(x,y); } } cube(100,100); } void cube(int x, int y) { fill(255,255,0); quad(x,y,x-50,y-25,x,y-50,x+50,y-25); fill(100,100,255); quad(x,y,x+50,y-25,x+50,y+25,x,y+50); fill(255,100,100); quad(x,y,x,y+50,x-50,y+25,x-50,y-25); } \===========================================/ This impossible triangle needs different shades of gray.  This is actually black and white squares, all the same size, in straight lines. Your brain only THINKS the lines are slanted.  This image contains 12 black dots, but you cannot see them all at once. Nevertheless, your program needs to draw 12 dots. Optical Illusions - 14 May 2019The idea of making more educational animations didn't seem so popular. So we will study Optical Illusions this week and next. We can start with this common example: We will discuss how this is related to the artist Victor Vasarely: and what special techniques are used to create Optical Illusions. Here are some simple example Optical Illusions:
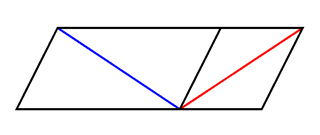
Are there 4 boards or 3? 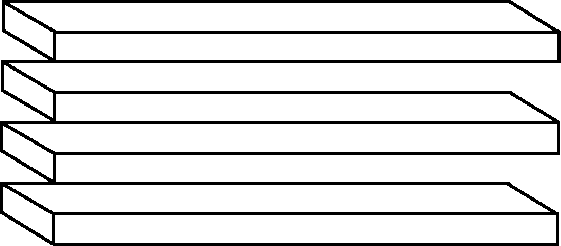 Is the white triangle really there?  We will start with this sample program: /===================================\ void setup() { size(700,600); textFont(createFont("Arial",24)); } void draw() { background(255); // white fill(0); text("First Second Third Fourth",30,30); if(mouseX < 110) { firstPic(); } else if(mouseX < 220) { secondPic(); } else if(mouseX < 330) { thirdPic(); } else if(mouseX < 440) { fourthPic(); } } void firstPic() { strokeWeight(5); stroke(0,0,0); for(int x=200; x < 400; x=x+10) { line(x,120,x,200); } stroke(255,0,0); fill(255,200,200); ellipse(300,300,300,300); fill(0,0,255); ellipse(250,250,30,30); ellipse(350,250,30,30); fill(255,0,0); ellipse(300,300,50,100); fill(0,0,0); rect(250,380,100,20); text("BART",270,90); } void secondPic() { text("Second",250,90); for(int y = 0; y < 256; y=y+1) { strokeWeight(1); stroke(2*y/3,0,255-y/2); line(100,y+100,500,y+100); } } void thirdPic() { text("Third",250,80); for(int x=100; x < 500; x = x+40) { fill(x/2,x,x/4); rect(x,100,40,40); } } void fourthPic() { text("Fourth",250,70); noStroke(); for(int y=100; y < 500; y = y+40) { for(int x=100; x < 500; x = x+40) { fill(x*3 % 256, y*2 % 256, (x+y) % 256); ellipse(x,y,40,40); } } } \=====================================/ Animated Educational Review Video - 6 May 2019This week, you should work with a PARTNER (groups of 2) to produce a short presentation (about 1 min) that is a quick and useful review of some topic you studied in a class this year, preferably a topic that might appear in a final exam. Here is an example about Muhammed Ali: Here are the guidelines for your presentation: - aim for about 1 min - the result must be a video, prefereably .mp4 format - ALL elements must be animated. At the very least, each text piece and each image should SLIDE or FADE into place, rather than just sitting there as a static element - Focus on what the VIEWER will see and experience. Hence: - be careful with timing - not to fast and not too slow - use LARGE FONTS that are easy to read - use small pieces of text that arrive one after another - use images that are CLEAR, without tiny details - use colors to enhance the experience The Ali example is not particularly good from a graphics standpoint. It was created with Google Slides, which does not have very many interesting animation possibilities. Your presentation must be AT LEAST that interesting, but try for somethint a bit more exciting if you can. The Ali example was produced as follows: - find good IMAGES and .GIF ANIMATIONS in Gooble Search and download copies into a folder - used Google Slides to create a presentation - uploaded images from hard-disk into the presentation - use ANIMATIONS to make elements appear and move - adjust timing to make it readable and hold the reader's attention - stick to the most IMPORTANT and ESSENTIAL details - this is for exam REVIEW, it is not an entertainment video If you wish to use a different tool than Google Slides, that is fine. For example, Powerpoint has a lot nicer animation possibilities. You must produce this quickly - it is due on Thursday 9 May at 18:00. So find techniques that are fast and productive, and use them over and over. You may upload the entire video into Haiku if you wish, but it is probably simpler to save it in Google Drive (or a web-server) and just upload a LINK into Haiku. On Friday we will review all the contributions in class, looking for good ideas. The POWER of Graphics and Animation - 3 May 201920 UX Design Examples 5 Web-site Design Hints Engaging Presentations (speeches) Effective Starts Secrets of Great Design The Greatest Ted Talk Ever Sold Headlines and Grabbing Attention GIF Animations - 16 Apr - 2 May 2019== Examples == Take a look at these sample .GIF animations, made by last year's class. == STYLES == Here are a few basic styles:- - Stick-man figures - faces (emojis) - cartoons - like SouthPark : - Monty-Python style with photographs and moving pieces : https://www.youtube.com/watch?v=2AxiATxLofk Dancing Teeth - https://www.youtube.com/watch?v=2lTMiQsMH1g - animated letters == STEPS == Making your own animated .GIF involves 3 basic steps: 1 - Vector Graphics Editor You must use a Vector Graphics Editor, not a photo editor. You will make many frames and they will all be quite similar, with only minor changes. The changes involve moving or changing a few small pieces. If these pieces are vector-oriented, the changes are easy. If they are pixel-oriented, like photos, it is quite difficult. There are many Vector Graphics editors available. One simple example is the Google Drive Drawing editor. 2 - Save a sequence of images, using names like pic1, pic2, pic3, etc. But DON'T save them as .SVG files, as the next tools needs to receive bit-mapped (pixel) images. .PNG is a good format, using decent compression and 32 bit color. 3 - Use https://ezgif.com/maker to upload your images, and create a .GIF animation. Adjust speed and size before downloading. Then download your finish .GIF file. == FIRST TRY PRACTICE == Today, make one or two examples. For the first try just make 5 or 6 frames - not too many. Then upload and make your .GIF animation. After that you can work on a "really nice" one. Then try a different style - e.g. if you made a SMILEY, then try making a Stick-man. Turn in your Project - 15 Apr 2019EACH member of the group must upload the SAME LINK to your COVER page - upload into Haiku. Finishing Software Review Project(s) - 9-15 Apr 2019You should continue working in the same GROUPS that you had last week - 3 or 4 students per group.
Each group must produce 3-4 sets of Web-site Instructions. These should be the same topics that you originally produced. Each group will turn in all of the projects, and receive a GROUP GRADE for ALL the projects together.
You will need to add a bit more:
- finish each project, according to the comments produced by you Beta Test - if your presentation was too short, then add more
- ensure that the 3-4 projects all follow general rules for appearance and presentation. That does not mean that they should all be identical, but if you decide on text at the side of the page rather than over the image, then you should all do that - or vice versa. Whatever you decide is GOOD PRACTICE, you should all follow those good practice rules.
- Make sure EACH PROJECT produces a VIDEO. If you originally produced a Presentation, you will need to do a SCREEN CAPTURE VIDEO of you clicking through the presentation
- You must add a COVER PAGE that includes LINKS to all the videos. This should be an attractive, interesting page. You may do this as a WIX page if you wish, or as a Google Sites page, or as a web-page uploaded to an e-portfolio in Haiku. In any case, it must be accessible by all students and teachers a FIS.
- At the end, EACH member of the group must upload the SAME LINK to your COVER page.
This is DUE ON MON 15 Apr at 18:00.
Software Review - 8 Apr 2019After the Beta test, programming TEAMS must review their software, connecting Beta Test comments to needed improvements in their software. Some changes are probably needed to address some of the Beta comments. In the real world, this would be a long process, but we will do it quickly as we are not actually intending to sell our software.
We will discuss some of the comments and look at some specific examples.
We wish to create some GUIDELINES for producing successful software.
Beta Testing - 4 Apr 2019Most students turned in their first draft, but not all. That is foolish, because it is not possible to continue to the next step.
The next step is a BETA TEST. This means that the product is given to an actual user, who then uses the product and RESPONDS with suggestions/complaints/commendations about the product.
The teacher viewed all the Guides that were turned in on time (about half the students), and here are some possible responses:
- text is difficult to read because
- the font is too small - the font color is too similar to the background - the text disappears too quickly
- the entire presentation seems to short - surely there are more features
- the author did not write their name anywhere - normally it is at the end
The class should now split up into groups of 3 or 4 students.
In the group, ALL the products must be collected into a central place
where they are available to ALL the Beta Testers. Now all the students in the group should view ALL the presentations, including their own.
They must WRITE their reactions, which may be positive or negative.
These should include:
- questions if something is confusing, unclear or missing - commendations if something is particularly useful or interesting
- suggestions for improvements (like those written above)
All the written feedback must be stored centrally, where it is available to the authors, the Beta Testers, and the teacher. A simple method for this is to use a Google Doc that is shared, allowing access to all members of FIS.EDU.
This should be finished before the beginning of class on Monday 8 April.
Continue Highlight GUIDES - 2-3 Apr 2019Continue working on your Highlight GUIDE for your favorite Web-Site. Turn in a first draft on Wed 3 Apr before 18:00.
After that we will look at several examples and talk about
how to make them better.
Highlight GUIDES - 27 Mar 2019
Wikipedia is HUGE - that is both a blessing and a curse.
Because it contains information about "everything", we can
always count on finding (some of) the facts we need,
like:
- an actress' age
- the location of Zimbabwe
- the winner of last night's football match (??)
Unfortunately, the sheer SIZE and DEPTH of Wikipedia articles
can make it DIFFICULT to find a specific fact.
To find a specific fact, we probably turn to Google and ask a question, like:
- when was the first automobile invented?
- how many automobiles will there be worldwide in 2020?
- will all those automobile drivers be happy? The first question is no problem. The second one is only
an estimate, so you may get a variety of answers from different sources.
The third question is probably more interesting than the other two,
partly because the answer is NOT really FACTUAL.
In any case, we are happy to use a SEARCH tool.
But when you use Google, you are using the ENTIRE WEB
as your source material. Unfortunately, there is no EDITOR
for the World Wide Web, so the RELIABILITY is uncertain.
Still, there are LOTS of interesting OPINIONS.
What we all want and need is a BRIEF SUMMARY of whatever
sources we might need. A Google search is a VERY BRIEF
summary, with just a couple sentences. We really need something
that is a bit more attractive and interesting. News sites sort of
do this, by showing a headline and the first few sentences,
and maybe an image. For example:
Another advantage of summaries is that they encourage SERENDIPITY.
That means you find things that you were NOT looking for. As you glance
through a news site, you are likely to see something interestng that
you were not searching for.
Now we have all these possibilities, but they all require a computer keyboard
and mouse - it's harder with your Smartphone. But you cannot do these
search techniques on a TV display in a lobby, like the TVs we have in
the school's entrance ways. Also, searching can be time-consuming
and does not always lead to a sensible conclusion in a reliable way.
So a summary that is just a bunch of links is not quite the best thing.
A summary that GUIDES you through some ideas is similar to
a movie preview - a specific sequence of short clips that present
exactly the BEST parts, with the intention of encouraging you to
go see the movie. You could think of this as a GUIDED TOUR
of a web-site(s). You see this sort of thing in short INSTRUCTIONAL VIDEOS,
that are introducing you to a piece of software or a service.
Now we want to make these GUIDES interesting and brief -
a Ted Talk is not the right thing, even though it might be very interesting.
Rather, a video that claims to be a SHORT INTRODUCTION is
the right thing. Or a TRAVEL BROSCHURE. Or a TOP TEN video.
You should base this project on a specific WEB-SITE that you visit often -
as long as it has LOTS of pages and LOTS of features. Your GUIDE
presentation should make sensible suggestions about where the
viewer should look in the site, as well as a clear statement of
HOW TO GET THERE. This is especially important if it is
DIFFICULT to find something.
Here are some example web-sites that would benefit from a GUIDE:
- Wikipedia
- Amazon
- Wolfram Alpha
- Google
There are many, many other possibilities.
Your GUIDE may be presented in a variety of ways -
as a video (with short clips), as a PowerPoint presentation,
as a slide-show with screen-captures and text,
as a new web-site with links into the big web-site.
DON'T present this as an essay, full of text,
although you may include short text statements.
Such GUIDES for web-sites don't really exist very much,
except maybe as YouTube videos.
Your presentation must not depend on sound because
it should be viewable on a TV in the hallway, without sound.
The teacher will show a couple examples in class,
but don't copy these examples. Use your imagination to
create something that is interesting and functional.
For example (not necessarilty good)
https://www.youtube.com/watch?v=JPaTYZew1b8 (Wikipedia) https://www.youtube.com/watch?v=Kjw2ibwTkqg . (Wikipedia)
https://www.youtube.com/watch?v=5_InkgVIpHc . (Wolfram Alpha)
Sites.Google - 25 Mar 2019We will look at what is possible in Google Sites.
What is NOT possible is JavaScript - that is not permitted by Google. But you CAN do:
- WYSIWYG Editing - HTML coding, with some limitations (you'll find out)
The good news with Google Sites is that it is IMMEDIATELY ONLINE -
just click [Publish] (after sharing it with the world).
Your web-page / web-site is constantly updated as you type,
but you still need to click [Publish].
If you really NEED to write some JavaScript, for a quiz maybe,
you can write this in a separate web-page, store it on a web-server, and then link to it from Google Sites. == Practice ==
Continue Kompozer - 22 Mar 2019Continue exploring Kompozer. Do all the tasks listed yesterday.
Then you can try the following short project:
Kompozer WYSIWYG Editor - 21 Mar 2019Download Kompozer here:
(If you have trouble installing Kompozer, you can use SeaMonkey instead.
Download SeaMonkey at: https://www.seamonkey-project.org/releases/)
Kompozer is a WYSIWYG HTML Editor - What You See Is What You Get
It edits HTML pages that are stored on your computer, just like Komodo,
but it lets you work in a VISUAL mode like a Word-Processor.
You can still switch to HTML Source Code view to make detailed changes, but you can get a lot of work done in WYSIWYG mode.
For example, try to do the following:
- insert an image by finding an image in Google Images,
and then just DRAG it into your page. Does that work?
If not, try it with copy and paste. If that doesn't work,
try it with [Insert][Image] and then paste the URL in.
-Create a TABLE with 2 rows and columns.
Then insert 4 images into the table
Resize the pictures so they are all the same size.
- Add an .onclick function (JavaScript) to one of the picture.
You will need to assign an ID to the picture.
- Put a link on one of the pictures.
- Put a title on the page and change the FONT and the SIZE and Color.
- Find out how to insert special characters.
- Insert a BUTTON with .onclick function - the teacher will show
how to do this - Make a COPY of your last project's index.html file,
and try opening this in Kompozer. You may find that some things don't work well.
- Find out what other features exist.
Continue with WIX - 19 Mar 2019Continue making a WIX site. Be sure to explore images, slideshows, and videos.
Find out how to change BACKGROUND COLORS.
WYSYWIG Web Editors - 18 Mar 2019The World-Wide-Web was invented by Sir Tim Berners-Lee, around 1990. He invented HTTP and HTML, along with the idea of web-servers.
At the beginning, we had HTML pages that only presented text, with colors and fonts, and images. That was HTML ver 1. The Web became publicly available around 1995, when HTML 2 was introduced, with images and some other improvements. The really big improvements happened in HTML 3.2, including videos and JavaScript. HTML 4 happened around 2002, and HTML 5 around 2009 - but it is still being improved.
Along the way, developers got sick of writing HTML text codes, because it is very time consuming, involves lots and lots of little details, and is very error-prone (as you have probably seen now). So, they decided to create WYSWIG editors that are very similar to using a Word-Processor. Even better, they created Content Management Systems, that allow the developer to drag and drop design elements, and the software writes all the detailed HTML codes.
Generally, the really powerful CMS software systems make it very easy to make web-sites that look nice, but they don't make detailed work easier (in fact harder). Many systems simply forbid JavaScript. So if you need automation, CMS isn't the best solution. So a WYSIWYG editor is a good balance, performing lots of the detail work automatically, but still permitted the developer to write JavaScript and to change details manually if they wish.
We will look at several HTML editing systems, including:
- WIX = a very powerful CMS with lots of "widgets"
- Google Sites = a straightforward WYSWIG editor, but without JavaScript
- Kompozer = a very good middle-road compromise, that supports
WYSIWYG editing, HTML codes and JavaScript. We will spend a couple days on each of these, to see the differences.
We will start with WIX at http://www.wix.com
You can get started quite easily by logging in with your Google account.
Spend today exploring the [Add] items.
If you want to see a tutorial, you can try this:
Going LIVE! - 15 Mar 2019
Now we are going to put all the projects online.
It works like this:
- you must change the name of your main page to "index.html"
- COMPRESS your folder
- in Haiku, click on [My ePortfolio]
- click on [+ Add Content Block] and choose [Minisite]
- click [Choose File] and upload your .zip file
- Haiku will create a link to your index page, which is now stored on an Amazon Web Services server.
If you want someone to see your page, you must give them the link.
Today, we will start out like this:
- each student uploads their web-site into Haiku (AWS) - then each student copies the link into a Google Doc which we will make and share together
https://docs.google.com/document/d/1jvAHMxKnB96dQCPlo-RJ7cCPPwAuejLBJ_ufcYBEa3M/edit?usp=sharing - students should now investigate other students' web-sites
- if you find problems, you need to report them to the author,
by writing a comment below the link on the Google Doc page Starting Monday, we will make a MASTER page with links to all the student sites.
Information about IB Computer Science - 5 Mar 2019If you are interested in taking IB Computer Science next year,
you will find a lot of information on this page:
If you have further questions, you should ask Mr Mulkey and/or your counselor.
Web-page Project - 1 Mar - 12 Mar 2019We will work on this project in class from today until Tuesday 12 March at 18:00.
If you will be missing school during a sports tournament, your deadline is Friday 15 March.
HTML/CSS/JavaScript Project
You have seen a variety of sample web-pages, using external libraries (like for math),
HTML for buttons and divs and links, CSS for effective styles, etc.
All the examples were simple and had no real purpose.
Now you need to make a web-site that has a clear purpose.
Your web-site should have an EDUCATIONAL purpose.
Although it may also have interesting or entertaining elements,
the main purpose should not be entertainment. The main goal is that the page is VERY EASY TO USE.
== Starting ==
You will notice that most web-sites are TOO BIG and nobody wants to
read all that stuff. They prefer "snippets" of information. For example,
if you are doing Math, then you might find a huge web-page about math,
but what people really want is something small, like the quadratic formula.
== Main Page ==
Now you will need a MAIN PAGE for your project.
It needs to contain:
== Layout Issues ==
== ACTION! ==
== SUB-PAGES ==
Slideshow - 28 Feb 2019Download this folder:
http://ibcomp.fis.edu/2018/graphics/SlideShowFading.zip Try making some of the changes listed.
Links and Menues - 27 Feb 2019Look at this sample page:
http://ibcomp.fis.edu/2018/graphics/dropdown.html Do the practice exercises listed on the left side.
Using CSS for Style - 25 Feb 2019Look at this sample page:
Copy the source code into Komodo and make some changes:
- try clicking on all the right answers and make sure
they work correctly. Then try the wrong answers.
Some of them work sensibly, others don't work at all.
Add FUNCTIONS to make all the wrong answers
work like the first math question.
- Add one more question below the Greek question.
This can be any True/False question.
It needs two answer buttons : [True] [False]
Make them work correctly.
- For the map question:
- add a background color - add functions for the right answer and wrong answers
- At the bottom of the page, add this question:
1/2 + 1/4 + 1/8 + 1/16 + 1/32 .... forever
Use proper math notation to make proper fractions.
The possible answers are [1][2][3][4]
Make the div very wide, but narrow up and down.
Stacked Divs - 15 Feb 2019Using the same code ideas from yesterday,
create a page with 5 math questions.
These should be stacked on top of each other,
like a deck of cards. After the user completes
the first question correctly, it should disappear
(use divname.style.visibility = "hidden").
You should make all the divs the same size,
so use a size that is big enough for the biggest question.
Make some of your questions with COMPLEX
math formulas - not like sin(90), but rather
2 2
sin x + cos x
-------------------------
0.5
After vacation, we will learn some more powerful
and sophisticated programming ideas in JavaScript -
to avoid so much copying and pasting of code.
Math Quiz - 14 Feb 2019Here is a page with a simple math quiz:
We will improve this page.
Math Libraries - 12 Feb 2019MathML example: https://www.w3.org/Math/XSL/pmathml2.xml
MathML instructions: https://www.w3.org/TR/MathML2/chapter2.html
MathJax example: https://www.mathjax.org/#samples
Mr Mulkey's MathJax example: http://ibcomp.fis.edu/2018/graphics/MathJax.html
MathJax practice: example on jsbin
MathJax documentation: https://math.meta.stackexchange.com/questions/5020/mathjax-basic-tutorial-and-quick-reference
You may find this Unicode Math page helpful:
And this page contains a complete list of special symbol abbreviations for MathJax:
http://docs.mathjax.org/en/latest/tex.html?highlight=special%20symbols Text Layout for Mathematics - 11 Feb 2018Have a look at this web-site:
There are lots of issues here - the teacher will explain them.
Here are some suggested practice exercises, to complete using Komodo:
- Display a web-page titled Quadratic with the Quadratic formula on it,
like you see on this web-page: https://www.purplemath.com/modules/quadform.htm
You must create the formula as text, by using POSITION
- Write this puzzle problem:
 - Write this series properly: 1/2 + 1/3 + 1/4 + 1/5 + ...
- Write this EXTENDED FRACTION:
 Letter Puzzle - 8 Feb 2019We will work on this program:
You may find these Color pages helpful:
Now We Start HTML+JavaScript - 6 Feb 2019You need to download this .zip file and uncompress it.
Then you need to download and install KOMODO, an HTML editor:
or borrow a USB stick from the teacher.
The teacher will explain how this all works, and we will do a little practice.
Greenfoot Project - 30 Jan 2019Your assignment is to write a Greenfoot program containing all of the following:
- at least 4 different classes of objects, all moving
- at least one of the classes must move using MOVE and TURN turtle commands
- at least one of the classes must move using ARRAYS of turns and moves
- at least one of the classes must move via PARAMETRIC formulas
and setLocation - ALL classes must provide PARAMETERS in the CONSTRUCTOR
so the world can create several different OBJECTS from a class
that behave in different ways. There may be some objects that move
in parallel, but not all of them should do that.
- there must be at least 3 Objects made from each class,
so a total of at least 12 Objects
- all Objects must start moving automatically when [RUN] is clicked
- the Objects must stay on the screen, not disappear off the edges
- some of the Objects must draw lines or dots
- the result should be an interesting combination of moving Objects,
and some interesting curves/lines on the screen
- the Objects should move at a reasonable speed, not jumping
extremely fast (unless the speed control is increased greatly)
- some of the Objects should move in curves, others should move in straight lines
- make it interesting and attractive, buy using images that fit together sensibly
The project is DUE on Tuesday 5 Feb at 18:00.
To turn in the project, you need to COMPRESS the folder containing it
and then upload the .zip archive into Haiku.
Parametric Equations - 29 Jan 2019One more possible approach to creating trajectories is called
PARAMETRIC EQUATIONS.
This is similar to a mathematical graph, but we create a formula for X based on time, and a separate formula for Y based on time.
For example, the formulas for a circle are:
x = centerx + cos(time)*radius
y = centery + sin(time)*radius
Here is code for the APPLE to make it move in a circle:
/*********************************************\
import greenfoot.*;
public class Apple extends Turtle
{
double speed = 0.1;
double time = 0;
int centerx = 200;
int centery = 200;
public Apple()
{
penDown();
}
public Apple(int startx, int starty, double howfast)
{
penDown();
centerx = startx;
centery = starty;
speed = howfast;
}
public void act()
{
time = time+speed;
double x = centerx + Math.cos(time)*100;
double y = centery + Math.sin(time)*100;
setLocation(x,y);
move(0);
}
}
\***********************************************/
The command for creating the APPLE in the world is:
addObject(new Apple(200,200,0.1),300,200);
The teacher will show how to modify the circle to make
it more interesting, like a LISSAJOUS curve:
Trajectories in Arrays - 25 Jan 2019The program STEPS THROUGH the TURNS and MOVES array,
and executes each step one at a time. After 16 steps,
it goes back to the beginning.
== Practice ==
1 - make an object that moves back and forth, left then right
2 - make an object that moves diagonally from the
top left to bottom right, and then back
3 - make an object that moves in a zig-zag, like this:
/\/\/\/\/\/\/\/\/\/\/\/\/\ 4 - make an object that moves in a circle and then,
after completing the circle, moves around the circle
in the other direction
5 - choose a letter with straight lines and curves, like P.
Make an object that draws that letter. /**************************************************\
import greenfoot.*;
public class Baby extends Turtle
{
int[] turns = {90, 0, 0, 0, 90, 0, 0, 0, 90, 0, 0, 0,90, 0, 0, 0};
int[] moves = {50,50,50,50,25,25,25,25,50,50,50,50,25,25,25,25};
int maxmoves = 16;
int count = 0;
public Baby()
{
penDown();
count = 0;
}
public void act()
{
int dir = turns[count];
int speed = moves[count];
turn(dir);
move(speed);
count = count + 1;
if(count >= 16)
{
count = 0;
}
}
}
\**************************************************/
Trajectories - 23 Jan 2019We will be studying how to create INTERESTING TRAJECTORIES for objects.
We will look at this example:
We will use this Greenfoot program:
== Practice ==
In BOUNCER - Greenfoot Quiz - Space Battle - 21 Jan 2019Download this program for your quiz:
http://ibcomp.fis.edu/2018/graphics/SpaceBattle.zip Baby Catcher Practice - 18 Jan 2019Download the Greenfoot program at: https://dl.dropboxusercontent.com/u/275979/graphics/Greenfoot/BabyCatcher.zip This is the Baby Catcher game. The player moves the ambulance left and right with the arrow keys, Run the program, do some experiments, and answer the following (1) Find the commands that make the pigs disappear when they (2) Put a second AMBULANCE on the screen. (3) Find the code that makes the baby(s) move. (4) Pigs and babies are created inside the [Game] world. (5) Add a new actor that is a horrible, evil monster. Bouncer Practice Quiz - 17 Jan 2019== BOUNCER - practice quiz ==
Download this Bouncer program Answer these questions about Bouncer Your quiz Monday 21 Jan will be similar to the questions above - Movement and Keys - Frogger - 14-15 Jan 2019Download this .gfar file : Frogger.gfar Do the practice tasks listed below (in any order you like).
Using Keyboard Keys - 11 Jan 2019You should do these problems. If you finish quickly,
go back and finish anything from the past 2 classes. == Keyboard Controls ==
Download this scenario (program): LTA If you run it, you can use left and right arrows to steer the car.
Red Circles Patterns - 9 Jan 2019== RED CIRCLES ==
Download the Greenfoot Scenario (program):
http://ibcomp.fis.edu/239179/graphics/GreenFoot/RedCircles2019.zip
Unzip this archive and then open it in Greenfoot (click on Project.greenfoot) This contains 3 different "TurtleWorlds". There are 3 different worlds. Try out each one. 1. Red-circles Fresnel Interference
2. Spirals
3. Squares
4. Your World
Greenfoot - 7-8 Jan 2019Video for Total Beginner:
Turtle Graphics Shapes in GreenfootDownload this starting project and open it in Greenfoot. (1) Add 2 more Triangle objects, to draw 3 triangles that
(4) Add 3 more Square objects to draw 4 squares that fit together Type commands to add 5 more Square objects, to place 9 squares in a 3x3 grid, making one big square. =============================================== More Practice with Turtle Shapes (6) Make a CLASS for each of the following shapes - test each class by putting an OBJECT on the program page. (a) Triangle (3 equal sides) (b) Square (4 equal sides) (c) Pentagon (5 equal sides) (d) Hexagon (6 equal sides) (e) Octagon (8 equal sides) (7) You can TILE (cover) the entire page with identical shapes by placing lots of identical OBJECTS on the page. Each object draws the same shape in a different place, and all the shapes fit together to cover the page. Make a "World" (program) for each of the following tilings: (a) tile the page with squares (b) tile the page with triangles (c) tile the page with a combination of Octagons and small Squares. (8) Make a new class called VariableTriangle . This class should accept a PARAMETER in the CONSTRUCTOR that tells the SIZE of the triangle. It looks like this: import greenfoot.*; public class VariableTriangle extends Turtle { int steps = 100; public VariableTriangle(int size) { setColor("red"); penDown(); steps = size; // copy SIZE into STEPS } public void act() { move(steps); turn(120); } } (a) Make a program that draws one BIG triangle, then triangles that are half as big and inside the BIG triangle. (b) Make a new VariableSquare that has a SIZE parameter in the constructor. Make a BIG square, then 4 smaller squares (half as big) that fit in the BIG square. Finishing Up - 12-13 Dec 2018(1) If your Board Game is not finished, please finish it
and make sure you turn it in no later than 13 Dec 18:00 (2) If you ARE finished, then:
(a) you may make some more improvements and turn in a second copy (b) show your game to another student (one who is finished)
and ask whether they can suggest some improvements
(3) You may explore this web-site:
Board Games - 29 Nov 2018Read this assignment:
Your game does not need to look "exactly" like Life or Monopoly or any other
specific game. But it should have "squares" (positions) where the player moves
around. You will find it difficult to make curved paths (like the picture of Life).
You should use a 2-D array to store data, and place squares in a grid.
Some positions might be "closed" and then do not appear on the display -
like in Monopoly, you only move around the outside edges of the board. The squares should contain some sort of rewards or activities, like earning money
or answering questions to win a reward. You might have dice or some other random
number generator that decides how far the player moves. Or you can allow players
to move around one square at a time, using the arrow keys. Or you can allow
the player to click on a square.
More ideas below on 19 Nov.
Your program is due on Tuesday 11 Dec at 18:00.
Game 2048 Ver 2 - 26 Nov 2018Download this program and do the tasks outlined:
Game 2048 - 21 Nov 2018Here is Version 1 of the 2048 game:
We will try to add:
- checking neighbors above and below - sliding when an arrow key is pressed
Last Kings Program - 19 Nov 2018Here is a "finished" version of the Kings program -
it doesn't play "smart", but at least it obeys the rules: There are lots of "board games" that involve a 2-Dimensional array (grid)
layout of positions. For example: - Monopoly - only plays around the outside edges - Chess, checkers
- 4-in-a-row
- Tic Tac Toe
- Othello
- Mine-sweeper
- Candy Crush
- Memory
- Scrabble, Crossword puzzles
- Sudoku
- Minesweeper
- Battleship
- 2048
Unless there are objections, we will make a Candy Crush Clone.
CLONE means that it is similar to Candy Crush, but need not
be identical.
The class chose 2048 instead of Candy Crush.
SMARTER Kings Game - 16 Nov 2018Download this program:
We will try to add some Artificial Intelligence.
Kings Game - 14 Nov 2018The teacher will explain the game.
Optical Puzzles with Colors - 5-13 Nov 2018Here is a video with optical puzzles:
Here is a Processing program with similar puzzles:
*** PUZZLE PROJECT - due Tuesday 13 Nov 2018 ***
(If you are going to a tournament, due date is Thu 15 Nov)
You may start with the sample program above, but do not
keep any of those puzzles - you must make your own.
You should make 5 or 6 puzzles - not all the same idea.
For example, you can make puzzles similar to those
in the video above. Here are some more suggestions:
- the same word over and over, where one copy is misspelled:
wrong wrong wrong wrong worng wrong wrong - lots of the same picture (like the faces) but one picture has a "mistake"
- lots of the same letter over and over, but one letter is different
- lots of copies of small photos, one of them is rotated or reversed
- two paintings next to each other, with one mistake in one painting
- any puzzle(s) that you find in videos similar to the one above
- use colors in some cases to make the puzzle more difficult,
like the flashing letters in the example
In each case, the user must be able to CLICK on the different object,
and then the program continues to the next puzzle. It is not necessary
to run a clock or keep score.
Pixel Colors with MouseOver - 31 Oct 2018Download this program:
http://ibcomp.fis.edu/2018/graphics/pixelsV4.zip PRACTICE == (0) Make the changes and improvements described by the teacher. (1) Try changing the calculations to produce some other interesting effects. (2) Add a few more words at the bottom of the screen, and make the picture change when you roll-over these new words - use different, interesting effects. Stripes - 30 Oct 2018Using the same program from yesterday, try these changes:
=== PRACTICE === 1. Change the stripes to 3 other colors. 2. Make stripes that look like the Germany flag - Black-Red-Gold 3. Make stripes like the Austrian flag. 4. Make 6 stripes, all different colors. 5. Now do all this on a DIFFERENT image. Your new image must be smaller than the goat, but not too much smaller. You need to change lots of numbers to accomplish this. Pixel Level Formatting - 29 Oct 2018Download this program: http://ibcomp.fis.edu/2018/graphics/pixelGoat.zip
Try changing the commands that alter the colors:
// make changes
r = r*2; // more red
b = b/2; // less blue
E.g.
b = 0
Drawing PIXELS - 25 Oct 2018(1) Change the colors of the lines in the top-left quadrant
(2) Reverse the bottom-left quadrant so pink and yellow are on the left side
and blue and green are on the right side
(3) Add an image in the bottom right quadrant - this should just be
an actual photograph loaded as a PImage (4) Change the random static in the top-right to use darker colors
Drawing with Loops - 23-24 Oct 2018We can draw "optical illusions" by using LOOPS.
The teacher will help you get started on the following: (1) Make a program to draw the first effect - (2) Make a program to draw the second GRADIENT FILL, (3) Make a program to draw the FRESNEL pattern - (4) Make a grid like below, by first drawing Explore Processing - 19 Oct 2018Processing was created by Computer Scientists at MIT,
intending to create a reasonably easy programming language
for graphic artists. They included a large set of sample programs. You can see all the sample programs in:
[File][Examples]
There are lots of folders in there. You can look at any of the programs
in any of the folders, but a particularly good folder is:
[Topics][Motion]
For example: BounceBubbles.
Choose any program that you find interesting.
Then try to change some numbers to make it better.
For example, in BounceBubbles, try to add more bubbles
Please spend today's class exploring the Examples in Processing.
Short In Class Programming Test - 18 Oct 2018To start your test, download the sample program:
or
Make the required changes, then show your running program to the teacher.
Clickable Words - 17 Oct 2018Download this sample program:
http://ibcomp.fis.edu/2017/processingGraphicsTutorial/christmasSong.zip or
Jigsaw Puzzle - 15 Oct 2018Try out this Jigsaw Puzzle.
Then download this program. Run it, and then do the practice exercises to make your own puzzle. You must first RESIZE your image to exactly 640x400 pixels. Then you can chop your picture into pieces using: http://imagesplitter.net/ After downloading and unzipping the .zip archive, you will need to rename your pictures, or else change the names inside the Jigsaw program. If you find better programs for these tasks, go ahead and use them. Controlling Variables - 10 Oct 2018We have been using VARIABLES (count, change) to CONTROL what
is happening on the screen. Sometimes these variables control HIDDEN
quantities - things we need but don't actually see.
Consider the problem of making the dice spin and then stop on their own -
like actually happens when you roll real dice. You might keep track of:
- how many total times it should spin (this could random)
- how many times it spun so far (so it can stop when it is complete)
- the current picture being displayed, which could be random
instead of sequential
We will make a new program, with "spinning" numbers instead of spinning pictures.
Here is a starting program:
More Spinning Dice - 9 Oct 2018If you have not finished the program from yesterday,
then continue with that. Otherwise try to add any of the following:
Spinning Dice - 8 Oct 2018Here is a program that has 3 spinning dice:
Sprites Project - 17-26 Sep 2018Here is an interesting example game: CookieMonsterB
Sound Effects
If sound is not working on your computer, you can try the following:
- open the [Tools] menu and choose [Add Tool]
- Click on [Libraries] and choose [Video] and then [Install]
That should install the Video library so that "import processing.video.*" works.
After that, the sound commands should work. If they still don't work,
you can create your project without sounds, or get help from the teacher.
=== Project - Sprites Video Game Assignment ===
Your assignment is to make a 2-D video game, using the Sprite library in Processing. Your game is due on Wed 26 Sep at 18:00. Your game MUST : - use the Sprite library - do NOT use any of the pictures or animations that were provided in the CookieMonster examples
- include a PLAYER object that is controlled by the keyboard - keep score somehow - include two or more ENEMY objects - include several FRIEND objects (e.g. food, power-ups) - include some objects that move around the screen automatically - include at least 2 objects that display ANIMATIONS - that you created by converting (or drawing) single frames - lose points or lives when an ENEMY is touched - gain points or lives when a FRIEND is touched - use all of the following commands sensibly: - setSpeed - place - show - hide - (optional) add sound effects
To get a top grade, you should - make a game that is fun, interesting, and winnable - make a game that is not boring or too easy - include enough objects to make things interesting and/or exciting - use attractive or interesting or effective graphic images Be CREATIVE! Be INVENTIVE! Take RISKS! But finish on time - you have 6 class days to complete this. A Better Cookie Monster - 14 Sep 2018Here is a more interesting example game: CookieMonsterB The monster is bouncing off the walls, moving diagonally, On Monday, we will start a small project that is due The teacher will explain how you can EXTRACT a .GIF animation Sprites Video Game Library - 12 Sep 2018INVESTIGATE the following program (the teacher will help):
|
| PImage pic; void setup() { size(1000,700); textFont(createFont("Arial",32,true)); pic = loadImage("http://img1.etsystatic.com/000/0/6014389/il_fullxfull.301779451.jpg"); background(255); image(pic,0,50,600,600); fill(0); text("Click the best fruit HINT",20,40); } void draw() { // this does nothing, but is required for mouseClicked to work } void mouseClicked() { if(mouseX >= 350 && mouseX < 450 && mouseY > 380 && mouseY < 480) { output("No, apples are sour"); } if(mouseX >= 100 && mouseX < 200 && mouseY > 440 && mouseY < 550) { output("YES! Grapes are SWEET!"); exit(); } if(mouseY < 50) { output("HINT : the best fruit is used to make purple juice"); } } public void output(String message) { javax.swing.JOptionPane.showMessageDialog(null,message); } /********************************************** (1) Add a response for the CARROT - NO, CARROTS ARE NOT FRUIT (2) Find your own picture. Make a similar QUIZ program - with lots of various responses and TWO correct answers. One answer outputs "correct" ends the program. The HINT button should provide information for this answer. The second answer outputs "FANTASTIC!" and ends the program. The click-boxes should be well aligned with the picture, but must not fit "perfectly" - you are just using rectangles. Put lots of boxes around lots of items, with a suitable response to each WRONG item, like the Apple response above. ***********************************************/ |
Mouse-over Images - 20 Aug 2018
| PImage pic; // this must include one variable for each picture void setup() { size(900, 600); pic = loadImage("http://www.albinoblacksheep.com/flash/960/waldo.jpg"); textFont(createFont("Georgia",32)); } void draw() { background(250,180,250); image(pic,0,0); if(mouseX > 400 && mouseX < 440 && mouseY > 250 && mouseY < 300) { fill(0,0,0); text("Waldow",100,580); } if(mouseX > 500 && mouseX < 570 && mouseY > 0 && mouseY < 60) { fill(0,128,0); text("Big Bear",100,580); } } |
Then add more names of other items in the picture.
Add as many names as you can in one class period.
- the bear at the bottom
what each entry does
Pictures in Processing - 17 Aug 2018
*** Daily Work - Computers Required - Bring Your Computer Every Day ***
- STARTING -
You will need to download and install Processing from:
http://processing.org or borrow a USB stick from the teacher.
Many students already installed this last year.
Processing can display pictures, like this:

Here is the program that draws the picture above:
|
PImage img1 , img2, img3; // this must include one variable for each picture size(600, 400); // the size of the window img1 = loadImage background(250,180,250); // background color = purple image(img1, 0, 0,300,300); // draws the image on the screen image(img2, 320,200,300,200); // image(variable,x,y,width,height) image(img3, 250,140,150,200); |
You might notice that image #3 (the small clown) is on top of images #1
and #2. Since image #3 has a transparent background, we see through the
background to see the other images.
Notice that each image requires a variable that is listed in the first line of the program.
Then each image must be loaded in the setup method.
Finally the images are displayed by the "image" command in the the draw method.
The image command is very similar to a rectangle command, but it starts
with an image variable.
The program will run in Processing from: http://processing.org
Alternatively, you can get a copy from a USB Stick from the teacher.
- PRACTICE - Do the following practice tasks:
- copy the program, run it and check that it displays the images correctly
- use Google to find 3 other images and replace the original images in the program
by copying the URL of each image into the loadImage commands.
- add more images to make a nice display, using at least 9 images of various sizes
that fit together properly to fill the window
- find an "animated gif" image and find out whether you can insert
it into your program and get an animated image as a result
- add as many images (large, small, animated) as you can do in one class period