Graphics Programming
- Frankfurt International School - Dave_Mulkey@fis.edu - 2013-14
Exercise Your Brains and Fingers - 16 June 2014
Last day of class today.
Please try both of the following:
- Exercise your brain with www.gamesforthebrain.com
- Practice typing - typing as fast as possible.
Here is a web-site with typing practice games:
http://games.sense-lang.org/
Or take a test (or lessons) here:
http://typingclub.com/typing-qwerty-en.html
Or try competing against other human beings at:
http://play.typeracer.com/
One More Game - 12-13 June 2014
If you still have not turned in your Alice story,
you must do that today - otherwise the grade
will be a ZERO.
----------
Today and next class, you should try out
This is an easy to use Game Designer system.
It supports various types of games, all of which
can be built with "drag-an-drop".
It's just for fun - you don't need to turn this in.
If you don't like Sploder, maybe you can find
something better on this page:
http://www.pearltrees.com/ardentseeker/make-ur-own-game/id1310761
But do try Sploder first - it really is very good.
Another Clever Idea - First Person View - 21 May 2014
Watch this video that shows how use keyboard controls
in a first-person game. You might want to add
a "first-person player" to your world.
Some Clever Techniques in Alice - 19 May 2014
Here are some notes than explain how to do some clever things in Alice:
- record your own sounds, like your voice, and insert it
- move the camera around
- make a billboard (a vertical sign/wall/background)
- insert 3-dimensional text, like a big heading
Here is a video with some more clever ideas about directions:
- viewing an object's perspective
- moving objects together
- "as seen by"
- "point at"
Dancing and Other Movements - 15 May 2014
Read these notes about the Historical Story Project.
Your project will be due on 10 June 2014 - that is the first
day of classes after final exams. That is a lot of calendar day,
but only 7 or 8 days of class, so you should get started.
You might want to know that there is a huge library of
Alice objects that you can download - read these notes
about Downloading Objects. You should choose a story
for which there are enough objects available.
Next week the teacher will help with some more complex
techniques that you might find useful.
Alice Test - 14 May 2014
Test today.
Make a Story in Alice - 13 May 2014
In Help you will find Example Worlds. In the EXAMPLES tab,
you will find a world with a dog and a cat - called Garfield-And-Odie. Start with this world and make a small story.
For example, the dog (Odie) might walk to the hole and
fall into the water. Then the cat (Garfield) runs to the mountain
and throws a tree into the water to save Odie. There should
be some "talking" and "thinking" text to make the story clear.
Tomorrow you will have a test, and you will need to make
specific things happen, similar to the story described above.
On Thursday, we will start learning some more complex commands,
like how to use LOOPS.
We will also do things like recording sounds, as outlined
in these notes - but that is for later.
Events in Alice - 9 May 2014
Read these notes: **Using Events**
Then do Tutorial #3 (Penguins) - really, do all the steps.
You will learn a lot. Then do the further practice questions.
Test Reminder - We will have a programming test
on Wed 14 May, covering the basics of Alice as
learned in the first 4 tutorials. We will do a bit
more practice on Tuesday 13 May.
Methods in Alice - 8 May 2014
Methods
with the
Bunny
and the Phone
Making Your Own World - 7 May 2014
Read the following and do the practice listed at the end.
http://ibcomp.fis.edu/graphics/alice/YourWorld/index.html
Alice 3D Animation Programming - 5 May 2014
After all the hard work we did learning to write programs in Javascript,
it is probably time for a break and an easier task.
ALICE is a programming system for 3D animations.
You will need to install Alice. You can download it from:
http://www.alice.org/index.php?page=downloads/download_alice2.4
Make sure you are using version 2.4 - you do not want version 3.
It is a pretty large download, so you probably want to copy it
from a USB stick in class.
The teacher will briefly inroduce the program. Then read
this brief introduction and do the exercises listed.
Freaky squares - 16 Apr 2014
Freaky
Squares
PaperJS Quiz - 14 Apr 2014
Fresnel Patterns - 11 Apr 2014
Remember we will have a programming quiz on Monday.
You will be using your computer and can use any notes or old code that you
wrote.
You will need to draw things similar to what we drew this week.
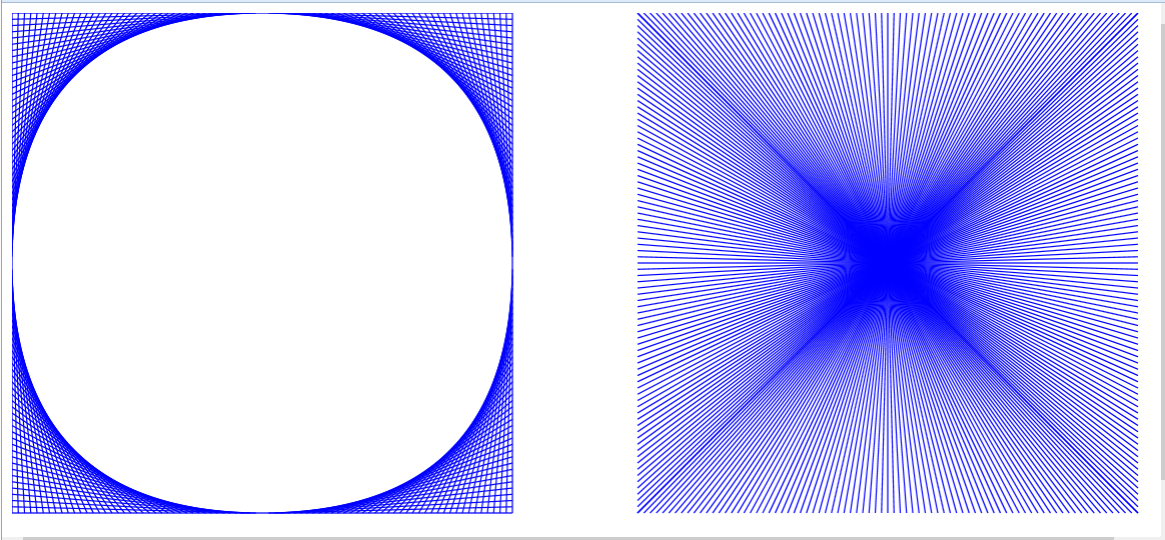
The drawings below are called Fresnel Patterns. They are made with
lines at various angles.
The pixels in nearby lines cause interference patterns, making surprising
shapes.
(1) Finish the left pattern that we drew yesterday.
(2) Draw the right pattern.
(3) Move the right pattern into the same area as the left pattern,
so the "starburst" is in the middle of the
"circle".
(4) If you finish early, you can add another starburst, back on the right
side,
but it should be turned 45 degrees, making
a diamond.
Here
is a solution for the tasks above.
Optical Illusions - 10 Apr 2014
We can create optical illusions by drawing lots of
lines and shapes.
Here
is an example. We will see how to write a program like this.
Here are some more ideas for optical illusions: http://illusions.org/dp/1-1.htm
Smoothing - 8 Apr 2014
You can finish the assignment from yesterday.
Once you have finished, read this tutorial:
Smoothing
and Flattening
Then try to draw a face. Draw a few points
the form a closed path, then use SMOOTH
to make the sides into curves. Add another
path that is a nose, and SMOOTH it.
Then add eyes and a mouth.
Drawing and Animating in Paper.js - 7 Apr 2014
Here
is a simple example animation.
The example has 3 shapes that are moving.
In each case, the shape is a Path. That means the shape is drawn
using straight lines the go from one point to another.
The teacher will explain how the commands in Paper.js function.
You should add more shapes to the example.
(1) Make a square near the top-right corner.
Use .rotate() to make the square spin
around.
Use a negative angle so that it spins
counter-clockwise.
(2) In the middle of the screen, draw a BLOCK LETTER.
You can do any letter you wish.
(3) Add a second BLOCK LETTER next to the first one.
(4) Make the 2 letters spin around together, so they stay
side-by-side, like a word. This is
accomplished by
rotating them around the same center.
(5) Change the STOP SIGN so that it moves UP the screen
instead of down the screen.
(6) Change the arrow to point to the left.
Then it should start on the right side of
the screen
and move to the left.
There are lots of tutorials and a reference manual available at:
http://paperjs.org
More Practice With Paperoids - 4 Apr 2014
We will focus on the PATH commands in Paperoids,
especially the ones that draw the numbers.
PaperJS - 2 Apr 2014
We are going to slowly work up to having Javascript programming skills
that will enable us to write some interesting games. We will start
with
another investigation.
You need to download and unzip this archive from PaperJS :
http://paperjs.org/download/
Inside the Paperjs folder, you will find
Examples/Games/Paperoids.html
This is a simple version of the traditional game Asteroids.
INVESTIGATE this game and do the following exercises:
- Open Paperoids.html in Komodo. View it in Firefox.
Notice that the controls are explained at the very bottom of the screen.
- Give yourself more LIVES. You need to find the function that
controls the Lives.
Find the part that takes lives away. Remove that/those commands.
OR just change the starting number of lives to a very large number.
- The BULLETS are way too small - I can't even see them on my screen.
But I know they are there, because they destroy asteroids.
Make the BULLETS bigger. You need to find the FUNCTION that
controls the BULLETS.
Something inside this function determines the size of a bullet -
HINT : it is set to 0.5. How stupid! That isn't even a whole
pixel!
Make the BULLETS BIGGER!
- There are too many ROCKS (asteroids). There is a number that
tells how
many rocks there should be. Make this smaller, so the game is
easier.
- Make the rocks move more slowly - now the game is even easier.
- Change the shape of the SHIP. Make it thinner, so it is harder
for the rocks to hit it.
- Every time you shoot a rock, you score points.
Find out where these points are actually awarded, and change it
so you always score TWICE as many points as the original settings.
- The numbers for the SCORE are drawn using simple lines.
This happens in the SCORE function, in the "new Path" commands.
Try changing these PATH commands to make SMALLER digits.
- This is a hard one. The game is actually more interesting if the
goal is to FLY AROUND and HIT the ROCKS, rather than shooting them.
But then you must change it so whenever a collision occurs, the
ROCK is destroyed and the SHIP is NOT destroyed. That's pretty
tricky.
More Puzzles - 1 Apr 2014
We will start by discussing some good and bad puzzles
from the web-site
http://www.coolmath-games.com/0-mini-scientist/index.html
Here
is a MATH puzzle. We will change this for practice.
Puzzles - 31 Mar 2014
Play
this game once. We will discuss the concept behind the game.
Then we will look at this
math puzzle and discuss how to make a math puzzle.
Presentations - 27 Mar 2014
Students will present the results of their investigations to the entire
class.
We will all be taking notes about the Javascript techniques
revealed in these presentations.
Investigating JS Drawing - 25-26 Mar 2014
Today we will investigate the paper.js
drawing library for JavaScript,
and/or this processing.js
3D library.
City Information Page - 14-21 Mar 2014
Due : 21 Mar 2014
The assignment is to create an INFORMATIVE and INTERESTING
web-page, using a variety of animations, to PRESENT information
about a city of your choice. Your page should NOT contain any
links to any other web-sites. It should NOT contain any videos.
Your page MAY use any pictures that you wish.
All the ANIMATIONS and ACTIONS must be done by writing
Javascript.
Suggestions:
- use a map of the city
- find photos from the city
- show interesting tourist destinations on the map
- show things moving across the map, maybe showing
how to get from one place to another
- use buttons/icons that cause animations or actions to start
- show pop-up photos that match places on the map
- show "cute" animations like a dancing penguin
- any other ideas that make your presentation
INTERESTING, INFORMATIVE and ATTRACTIVE
This must be ONE SINGLE web-page.
Due : Friday 21 March 2014 at 20:00 -
You must COMPRESS the
folder that contains
your page and images
(and PJ.js if you use it)
and upload the .zip
archive to Haiku
Dancing Penguin - 13 Mar 2014
Read
these notes. Download the page (with pictures),
then do the Practice exercises.
Practice with HIDING - 11 Mar 2014
Download
this page, open it in Komodo, and make the changes as described.
Sliding and PJ.js Quiz - 10 Mar 2014
Quiz
- click here
Custom Zoom - 7 Mar 2014
The Zoom function in PJ.js seems to have various bugs.
So we will make our own, like this:
baseball.onmouseover = function()
{
baseballZoom()
}
baseball.onmouseout =
function()
{
baseballUnzoom()
}
baseballZoom =
function()
{
setTimeout("Resize(baseball,55,55)",20)
setTimeout("Resize(baseball,60,60)",40)
setTimeout("Resize(baseball,65,65)",60)
setTimeout("Resize(baseball,70,70)",80)
}
baseballUnzoom =
function()
{
setTimeout("Resize(baseball,70,70)",20)
setTimeout("Resize(baseball,65,65)",40)
setTimeout("Resize(baseball,60,60)",60)
setTimeout("Resize(baseball,55,55)",80)
} |
Here is a web-page with one roll-over image that ZOOMS, and one the
RESIZES immediately.
Rollover
Bar
(1) Change the guitar so that it ZOOMS and UNZOOMS like the baseball
player.
It should also display a web-page when you
click.
(2) Add more ICONS that ZOOM and UNZOOM, and display a web-page when
clicked.
ZOOM - 3-4 Mar 2014
**** OOPS **** BUG ALERT ****
The PJ.JS library contains a bug
that stops the ZOOM command
from working correctly.
Here is a FIXED
copy of PJ.JS.
Download this and use it
instead of the original version.
|
Last class, we looked at a "Rich" and "Articulated" map.
School
Map 2
It uses a pink square to highlight a destination.
A nicer solution is to make something "grow" at
the destination, using an effect like this one:
Zoom(box,1,1,0,0,40,40,300,0,0)
which causes the box to zoom from size (0,0) to size (40,40) in 300 ms.
The other 1's and 0's are standard.
More details in #49 in the Plug-in
Library available here.
See
an example here in School Map 3.
Take this page - School Map 3 - and do the following:
1 - change the Sporthall and Upper School to have a Zooming square
2 - add more locations to the map, using Zooming squares
and providing information and a path (green
arrow) for each one.
Do as many as you can during class - for
practice.
Making a "Rich" and "Articulated" Map - 20 Feb 2014
A "rich" site, also called "articulated", presents multiple
pieces of information
in a clear and connected format. The map below shows positions
and
routes and text information for
various places in the school.
School
Map 2
You should add the following to your school map:
#1 Make an .onmouseover function for each item.
This should place a marker (e.g. square
div) at the position
each time the mouse is moved over a
name.
You will need some sort of marker, like a
colored div.
#2 Add an INFO area where text information is displayed
by the .mouseover function.
Continue with the School Map and Trips - 19 Feb 2014
Maybe you will find this easier:
School
Map
Continue adding more trips.
Practice with Slide and SetTimeout - 18 Feb 2014
We will practice some more today, so that you become FAST and EFFECTIVE
writing JavaScript with Slide and SetTimeout.
- Look at this
web-page
- Copy the page AND THE PICTURES to a local folder
- Add BUTTONS and TRIPS (animated sliding) for
as many locations as you can (there are 20 locations on the map)
Make sure each trip follows a REALISTIC PATH -
e.g. up stairs, through doors, etc.
More Sliding Pictures - 14 Feb 2014
Here are some examples of interesting graphic display
created with sliding and growing pictures:
Ads
(just watch the Ads - we won't use Flash)
Monty Python
Intro
Informational
Pages
More information about the Plug-in
Library available here.
More SLIDE and SetTimeout - 13 Feb 2014
Try
this web-page.
More work with SLIDE
and SetTimeout.
SLIDE and SetTimeout - 12 Feb 2014
We can make objects (probably pictures) slide around on a web-page.
Read
these notes for more information.
Homework : Do #1,2,3,4,5,6,7
Start with HTML5 Canvas - 10 Feb 2014
Do as much as possible
in this TUTORIAL page (you won't finish all of it).
After each paragraph, click the [Try It Yourself] button.
Then change some of the code (choose an obvious change)
and press [Submit Code] and look at what is displayed on the right side.
After you have run out of ideas for changes, go back and do
the next part of the lesson. Or you may skip around if you wish.
Take notes and bring questions to class on Wednesday.
Help each other!
Menues Web-page - 4 Feb 2014
Your assignment is to create a web-page with MENUES.
- there must be a TITLE at the top of the page (or below the menues)
- your name must appear below the title
- the page should have a background color that is NOT white
- there must be at least 3 menues
- the menues must be hidden when the page loads
- each menu must contain at least 3 items
- the page must contain 1 large <iframe>
- one of the menues must display pictures in the <iframe> -
not entire web-sites, but just pictures
- one the menues must display web-pages in the <iframe>
- one of the menues must jump to other web-pages -
it should not display them in the <iframe>
- ONE of the items must be Password Protected -
that means the link asks for a password before opening
DUE DATE - Friday 7 Feb at 18:00 .
Using <iframe> - 3 Feb 2014
This
page explains how to use an <iframe> to display web content.
Menues from Libraries - 31 Jan 2014
Here
is a "finished" version of the menues page.
Now we have seen the basic principals of how pop-up menues work,
we see that actually writing all the code is a massive job.
Today's Task -
Investigate various downloadable (free) Javascript library
systems
that create pop-up menues. Choose one that you like, and that
looks relatively easy to use, and implement the same links
that you did on yesterday's page - e.g. 3 sports links, 3 news links,
and 3 music links - in a new web-page. You will need to read the
instructions to understand how to use the library. If you can't
manage to get it working, get help from the teacher.
You can try the following sites:
- Dynamic
Drive
- Javascript
Kit
- HongKiat
- Wikipedia
List of Javascript Library Sites
More
Menues Practice - 29 Jan 2014
Please work in the Atrium today.
If you get stuck, you can go into 276 and ask Mr Mulkey for help.
OPEN
this page about menues.
Save it on your hard-disk and make the changes as described in the page.
Menues
in Javascript - 28 Jan 2014
We will work on this
menu script from Dynamic Drive.
Homework :
(1) Make the page shown below
(2) Add a second menu for MUSIC sites (or sports, or whatever you
like)
<!DOCTYPE html>
<html>
<head>
<title>Page Title</title>
</head>
<body>
<h1 id="newsHeader"
style="background:yellow;position:absolute;left:600px;top:0px">News</h1>
<div id="news"
style="visibility:hidden;background:#ffdddd;position:absolute;width:300px;height:100px;left:600px;top:45px">
<a href="http://www.cnn.com">CNN (Cable
News Network)</a><br>
<a href="http://www.elmundo.es">el Mundo
(Spanish)</a><br>
<a href="http://www.bild.de">BILD Zeitung
(German)</a><br>
</div>
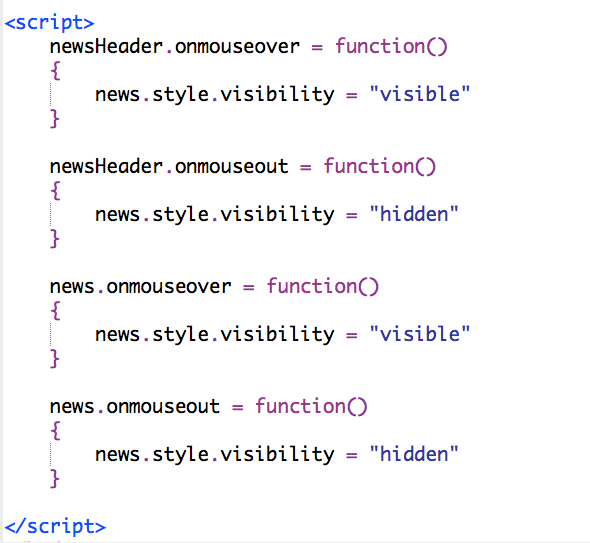
(The Javascript functions are a picture - you need to type them)
</body>
</html> |
More
Dynamic Drive - 23 Jan 2014
*** Don't forget to turn in your Picture Stack Page on
or before Friday ***
We made a Jig-Saw puzzle by using the DynamicDriveDrag.js PLUGIN script.
Dynamic Drive is a web-site with lots of free JS plugins that make
interesting effects.
Spend some time investigating the DynamicDrive web-site at:
http://www.dynamicdrive.com/dynamicindex4/
Homework:
Find an interesting effect at Dynamic Drive.
Remember where it is and be prepared to
describe this to the rest of the class on
Monday.
We will choose the most interesting effect presented,
and then do a small project using that effect -
or maybe 2 or 3 effects. On Monday, the teacher
will show you how to take JS code from the web-site
and use it in your own web-page.
Drag
and Drop - 21-22 Jan 2014
** Remember to turn in your Picture Stacks page SOMETIME THIS WEEK **
** Compress your folder (.zip) and upload it to Haiku **
Today - we will make a small jig-saw puzzle.
Here is a Sample
Page with instructions.
Use a graphics editor (GIMP or ipiccy.com)
to cut up the pictures and DynamicDriveDrag.js
to make the images draggable.
Click
Picture Stacks - 15 Jan 2014
Look at this
sample Picture Stack page.
You can download
the page and all the pictures here.
Assignment - Due Tue 21 Jan 2014
Create a page like the Picture Stack
page above.
Your page must contain 6 stacks of pictures,
arranged to fit on the screen (with no scrolling).
Each picture stack must contain at least
4 pictures.
It must also have a question/description,
as well as a button that checks whether the
picture is correct or not.
The whole page needs a [Check All]
button,
that checks all 6 results and display the total
of correct answers.
By next Tuesday (12:00 noon), you must
COMPRESS the folder
that contains your page and all the pictures,
and Turn In the .zip archive in Haiku.
More
with the Picture Puzzle - 10 Jan 2014
Here
is the finished puzzle from yesterday.
Here
are some notes that show how it works.
You can download
the entire folder here.
Open the Puzzle.html page in Komodo.
Then we will add more JavaScript to make it
a more interesting challenge.
Homework -
Starting with the Puzzle.html page that
you downloaded,
add the following:
- a CLICKS variable to count the number
of times
that buttons have been clicked
- a response like: "Very good -
only 2 clicks - you score 500 points"
- a SHOWALL() method that will make
all the pictures visible
as soon as the user guesses "skiier" correctly
- an ONCLICK entry for each picture
that makes
the picture disappear when it is clicked
First
Practice with Komodo - 9 Jan 2014
Follow
these instructions for creating a puzzle page.
Homework:
Be sure to finish #1-#4 before class on Friday.
More
Practice with EzJS - 7 Jan 2014
Use EzJS
.
You should have finished the Money program yesterday.
Now move on to the Translate sample program.
There are Practice exercises at the bottom of the page.
Change the HTML and Javascript to achieve the desired result.
Then move on to the Video_Quiz program.
Do the practice exercises at the bottom of the page.
This is a bit trickier, so you might not finish it.
We will discuss this further on Thursday.
Bring questions and problems to class on Thursday.
If you have trouble doing today's practice exercises,
get help from a friend.
Homework :
Make sure you download and install Komodo
Editor
before class on Thursday. We will be using this on Thursday.
Starting
JavaScript and HTML - 6 Jan 2014
We will be writing WEB PAGES, writing HTML and JavaScript.
We will start out using a very simple editor called EzJS
Later we will use Komodo
Editor , so you need to download
and install Komodo as soon as possible - certainly before Wednesday.
Here
is an introductory tutorial.
Finish
Greeting Card - 13 Dec 2013
Finish your Greeting Card program.
Compress (.zip) the FOLDER containing your program.
Upload the compressed .zip file into Haiku in the assignment dropbox.
If you finish early, try some of these games - they're good for your
brain.
http://www.gamesforthebrain.com/
Continue
Greeting Card - 11 Dec 2013

On your greeting card:
- use an interesting font(s)
- display more than one line of text, in different sizes
- use a "shadow" effect
To put a shadow effect under your text:
- display your text in color black
- move left and up by a couple pixels
- display the same text again in a different color
The example (above) uses black for the shadow and red for the foreground
text
in the larger text, then just black for the line of text below.
Use Contrast
If the background is bright, use a dark color for the text.
If the background is dark, use a bright color for the text.
Gradient
Fills and Greeting Card - 10 Dec 2013
** Assignment - Due Friday 13 Dec **
Make a Greeting Card (e.g. holiday card)
that has a nice picture with interesting
pixel-color effects (like we have been doing)
and some text on the top or bottom.
It should be attractive and/or interesting.
Try to use a nice font, too.
====================================
Here is one more idea for pixel-oriented color change -
a "Gradient Fill". It changes the color shading gradually,
one pixel at a time from top to bottom.

PImage
img,img2;
void setup() {
size(600, 450);
img =
loadImage("http://images.nationalgeographic.com/wpf/media-live/photos/000/006/cache/mountain-goat_635_600x450.jpg");
img2 = createImage(img.width, img.height, RGB);
}
void draw()
{
for (int y = 0; y < img.height; y++)
{
for (int x = 0; x < img.width; x++)
{
int p = y*img.width + x; //
pixel position
color c = img.pixels[p];
float r = red(c);
float g = green(c);
float b = blue(c);
b = b * (y/200.0) ;
r = r * ((400-y)/100.0);
img2.pixels[p] =
color(r,g,b);
}
}
img2.updatePixels();
image(img2, 0 , 0);
}
|
Stripes
- 9 Dec 2013

The picture above is created by this program:
Pixels
ver 3 - Stripes
This works by checking the value of X in the loop,
and then applying different filters to different X values.
Download the program and run it.
Then insert a different image (something from Google Images),
and then add more stripes using various filters -
maybe negative, maybe *2, etc. Try to make
something that looks interesting. Use lots of stripes -
maybe 10 or so.
More
Pixels - 5 Dec 2013
Download
pixels ver 2
Make the changes and improvements described by the teacher.
Programming
Pixels - 3-4 Dec 2013
Reminder - your Gambling Game is due on Fri 6 Dec (submitted to Haiku)
Today we will be manipulating lots of PIXELS - read
these notes.
Here is a first example:
PImage img,img2;
void setup() {
size(1200, 500);
img =
loadImage("http://images.nationalgeographic.com/wpf/media-live/photos/000/006/cache/mountain-goat_635_600x450.jpg");
// Load the original image
img2 = createImage(img.width, img.height, RGB);
noLoop();
}
void draw() {
image(img, 0, 0); // display img in top-left
corner
img.loadPixels();
for (int y = 0; y < img.height; y++)
{
for (int x = 0; x < img.width; x++)
{
change(y*img.width +
x); //***** the transformation ****
}
}
img2.updatePixels();
image(img2, img.width, 0); // display img2 in
top-right corner
}
void change(int p)
{
img2.pixels[p] = img.pixels[p] * 2;
}
|
Continue
Working on Gambling Game - 27 Nov 2013
If you are not making progress, get help from the teacher.
Work
in the Atrium Today - 25 Nov 2013
Continue building your gambling game.
Work in the Atrium today. If you get stuck
and need help, you will need to wait until
next class.
Starting
our Gambling Game - 19 Nov 2013
Here
is a program that "rolls" two dice.
It needs to be fixed so that the dice rolls are random.
Try out this
card game program.
Then read
these notes and try to think of a gamling game you wish to program.
Gambling
Game with Mouse-Clicks - 18 Nov 2013
Programming
in Processing (or Java) is a bit tricky,
as the mouse-clicks are ASYNCHRONOUS -
that means
they can happen at any time. This interferes with the
normal DRAW loop that is running continuously.
The best way to coordinate these two parts is
through the use of VARIABLES storing VALUES and STATES.

Here
is a sample program that is a basic start
of
a useful gambling game:
Gambling
Game 1
You might want to use these pictures:


Here
are some ideas for gambling games -
-
rolling dice (craps)
-
cards (poker, black-jack, etc)
-
roulette (spinning wheel)
All
these games have similar ideas:
-
the player makes a bet
-
some random result occurs
-
the user gets money or loses money
depending on the result
More Dice Games - 14 Nov 2013
We will discuss the games
from yesterday.
Here
is a presentation about the probability of rolling even or odd with
2 dice.
Here
is a more attractive dice game, showing big numbers.
Do the practice exercises described at the top of the program.
Testing Dice Games - 13 Nov 2013
We will test the games that the pairs wrote for homework.
Homework - spend at least 30 minutes on this at home (not more than an
hour)
- Investigate one of the other students' games
- If you finish, investigate another game
How to INVESTIGATE a program (specifically dice gambling):
1. Read the program
2. Find out:
- how many dice are there?
- how many sides on each die?
- how much do you pay (lose) at the beginning
of each game?
- HOW do you WIN?
- how much do you WIN each time?
3. Run the game to see if it looks like it is working correctly.
4. If the game is working correctly, run it several times
and figure out whether it is
- mostly winning
- mostly losing
- pretty much even
5. If it is NOT an even game, change the WINNING amount
and run the program many times until it is
roughly even.
Your Own Dice Game - 11 Nov 2013
This exercise should be done with a partner (groups of 2).
- Invent a DICE game. It
may involve any number of dice (at least 2).
The dice may have any number of sides (at least 4).
- The rules of the game are
that the player
- pays some money to play
- rolls the dice one time
- some result is evaluated and the player either wins
a certain amount of money or wins nothing.
In either case, they lose their original payment (bet).
- The goal is to devise a game,
result and pay-off where it
is not to obvious whether the player is more likely to win
or lose money in the long run.
- Write a program that simulates
the game correctly.
- In the next class, we will try out
the various games (on the board).
In each case, the class may choose to bet on either the "winning"
combination or to bet AGAINST the winning combination.
In other words, the students can choose to be the "player" or the
"house".
- You are REQUIRED to bring a working
program to class with you.
This will be a graded assignment.
Don't make it so difficult that
you cannot complete the program in the time available.
- Your grade will depend on whether the program works
correctly,
as well as whether it is a
close-to-even game, so that it is not
obvious whether we want to be the "player" or the "house".
Dice Games - 8 Nov 2013
Dice Games
Notes
Homework : Spend at least a half hour at
home
working ont he practice programs in the notes.
More About Methods (Functions) - 7 Nov 2013
Review the Homework from Tuesday. (Take notes!)
Today's Homework -
(1) Ask your math teacher what the "right" answer is
(2) Go home and TYPE the same program that the teacher
wrote on the board and make it work
properly.
(3) Change the program so that it does 3 dice,
decide
whether EVEN or ODD is more likely
Quiz, then Homework - 5 Nov 2013
Quiz
:
https://dl.dropboxusercontent.com/u/275979/graphics/processingGraphicsTutorial/clickPrimesQuiz.zip
Homework :
Read pages 115-117 in this book: Getting
Started with Processing
Start Processing.
Load the program Ex_08_01 from
Examples/Books/Getting Started/Chapter 8
Change the program so that it rolls 4 dice. All 4
dice should have 6 sides.
The program should ADD UP the TOTAL of the 4 dice.
Word Matching Quiz - 4 Nov 2013
- More practice with READING,
UNDERSTANDING and IMPROVING programs
Download this MATCHING
QUIZ program.
Do the practice exercises written at the beginning.
Homework - Practice.
We will have a short (20 min) programming quiz tomorrow.
More Practice - 31 Oct 2013
Complete the FCD Survey.
Then add more questions to your Clickable Quiz (practice).
Clickable Quiz - 29 Oct 2013
Download
a Clickable Quiz sample program here.
The sample program has 2 questions. You should add more questions.
For each question you need ONE IMAGE.
If the image needs to have many pieces, like several fruits,
you should use a graphics editing program (like GIMP)
to paste several pictures together and then save as one picture.
Green Money Rolling Pictures - 28 Oct 2013
** Don't forget to COMPRESS your video game and upload it to Haiku. **
Download this rolling-picture
program.
Continue Video Game - 21-25 Oct 2013
Your video game is due on Monday 28 Oct, at the beginning of class.
Friday is your last day to work on it during class and to get help with
problems.
You may finish it up over the weekend, but don't spend the weekend
adding lots of extra features - just finish up what you started.
To turn in your game:
1 - Find the FOLDER that contains your game
2 - COMPRESS the folder, creating a .ZIP file (archive)
3 - UPLOAD the .ZIP archive to HAIKU
Sprites Video Game Assignment - 17 Oct 2013
Sprites
Video Game Assignment
Hide and Show and Variables - 16 Oct 2013
We can make more complex games by using hide and show and variables.
For example:
- make 3 lives before ending the game
- make "food" disappear after you touch it (eat it)
- make an enemy (or friend) appear after you touched something specific
- set a "timer" so that a friend or enemy only exists for 5 seconds,
and then disappears
Cookie Monster QUIZ + Sounds in Processing - 15 Oct 2013
Download
this .zip archive, extract it, and then complete the exercises
required for the quiz. You may use any notes that you have available,
but you may not communicate with other students.
Once you have finished the quiz, and written all your changes on
the quiz paper, you can turn in the quiz and then try inserting
SOUND EFFECTS as described below.
------------------------------------------------------------------------------
Sound Effects in Processing
You can add sounds to a game, but this is not well developed in Processing.
You need to use .WAV files - you cannot use .mp3 files.
Typically you would add "sound-effects". This new version of CookieMonster
has sound effects for the cookie and the monster.
Sound effect .wav files can be downloaded from web-sites like:
http://www.wavsource.com/sfx/sfx.htm
(there are lots of other sites).
To add sound effects to your game, you need to do the following:
- make sure QuickTime is installed on your computer
- download sound-effect .wav files and store them
in the DATA folder of your Processing program
- at the VERY TOP of the program, add this command:
import processing.video.*;
- add VARIABLES at the TOP of the program:
Movie badsound, goodsound, ... ; //
these are the sound VARIABLES
- LOAD the sounds into the variables inside the SETUP method:
badsound = new Movie(this,"badsound.wav");
goodsound = new Movie(this,"goodsound.wav");
- PLAY a sound when the player hits something:
if( player.hit(monster) )
{
points = points - 500;
badsound.stop();
//
don't want to play it twice
badsound.play();
//
play the sound
}
Extracting Animated GIFs - 11 Oct 2013
You can make your own animated Sprites. You could draw them, but
that is an awful lot of work.
A better idea is to find Animated GIF files on Google images.
Then extract the single frames using the tool at http://gifninja.com/split-animated-gif/new
.
This will create a sequence of images named pic0000.jpg, pic0001.jpg,
pic0002.jpg ...
Then you need to add them to the Sketch folder in the DATA
sub-folder.
Read the notes in Cookie
Monster Sprites .
Today try downloading a GIF animation, extracting the frames, and adding
an
ANIMATED sprite to the CookieMonster program.
You can find lots of GIF animations at : http://www.animatedgif.net/
Adding More Sprites - 10 Oct 2013
Here is an improved version of the CookieMonster program,
with an EVIL
RAT added. The teacher will make these changes,
as well as showing how to add an ANIMATED MONSTER.
Sprites - for Simple Games - 7 Oct 2013
Read
these
notes about using Sprites for games.
You will need to download
this
.zip archive containing the sample game.
The teacher will explain how all this works. You should practice a
learn
how all this works today, Thursday and Friday (no class Wednesday).
We will have a programming quiz on Tuesday 15 Oct.
You will need to make some specified changes in a Sprite program.
After that, we will work on an actual video game for a week.
Continue the Game with Collisions - 25 Sep 2013
After the break we will be making a video game using a proper "Game Engine".
Before then, a bit more practice with basic concepts will help your basic
understanding.
Practice - continue the Game
Version
2 with collisions.
- Make the Player go back to the starting point whenever it touches one
of the robots.
Check that it really works correctly when you approach the robots
from various directions.
- Make the player "wrap around" correctly at the edges of the screen.
This requires a check at each edge. Send the player back
to the other side of the screen.
- Add a couple more enemies. Write a method (void) for each
enemy.
Make your new enemies smaller than the big robots.
- Check for collisions when the player touches your new enemies.
This should do something different, like sending the player to
a corner of the screen.
Animated Game ver 2 - 23 Sep 2013
Game
Version
2
Animation with Keyboard Control - 20 Sep 2013
First
Game
(very simple)
Animation - 18 Sep 2013
void
setup()
{
size(800,800);
}
int x = -220;
void draw()
{
background(204);
robot(x,0);
x = x + 2;
}
void robot(int x, int y)
{smooth();
strokeWeight(2);
ellipseMode(RADIUS);
// Neck
stroke(102);
//
Set stroke to gray
line(266+x, 257+y,
266+x, 162+y); // Left
line(276+x, 257+y,
276+x, 162+y); // Middle
line(286+x, 257+y,
286+x, 162+y); // Right
// Antennae
line(276+x, 155+y,
246+x, 112+y); // Small
line(276+x, 155+y,
306+x, 56+y); // Tall
line(276+x, 155+y,
342+x, 170+y); // Medium
// Body
noStroke();
//
Disable stroke
fill(102);
//
Set fill to gray
ellipse(264+x, 377+y,
33, 33); // Antigravity orb
fill(0);
//
Set fill to black
rect(219+x, 257+y, 90,
120); // Main body
fill(102);
//
Set fill to gray
rect(219+x, 274+y, 90,
6); // Gray stripe
// Head
fill(0);
//
Set fill to black
ellipse(276+x, 155+y,
45, 45); // Head
fill(255);
//
Set fill to white
ellipse(288+x, 150+y,
14, 14); // Large eye
fill(0);
//
Set fill to black
ellipse(288+x, 150+y,
3, 3); // Pupil
fill(153);
//
Set fill to light gray
ellipse(263+x, 148+y,
5, 5); // Small eye 1
ellipse(296+x, 130+y,
4, 4); // Small eye 2
ellipse(305+x, 162+y,
3, 3); // Small eye 3
}
|
Displaying Pictures - 16 Sep 2013
* We will finish the ROBOT program tomorrow. *
* Today, learn how to display pictures in Processing. *
Processing can load and display images (pictures), like these 3 images:
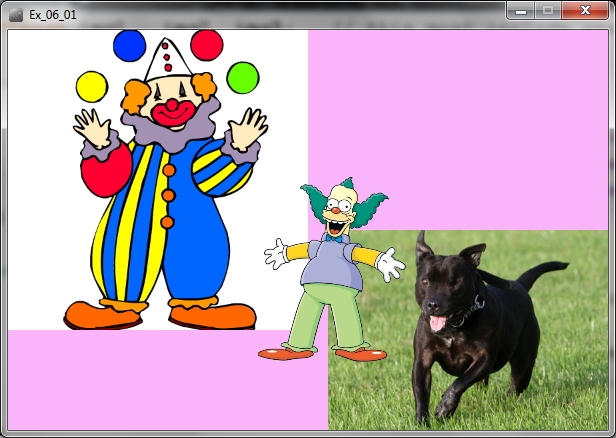
Here is the program that draws the picture above:
PImage img1 , img2, img3; // this
must include one variable for each picture
void setup() {
size(600, 400);
img1 =
loadImage("http://sunnysideprimaryacademy.org/wp-content/uploads/2013/05/clown.png");
img2 =
loadImage("http://static.guim.co.uk/sys-images/Guardian/Pix/pictures/2012/6/4/1338797575737/Staffordshire-bull-terrie-008.jpg");
img3 =
loadImage("http://images1.wikia.nocookie.net/__cb20090329034449/simpsons/images/e/e5/Krusty_The_Clown.png");
}
void draw()
{
background(250,180,250);
// background color = pink
image(img1, 0, 0,300,300); //
draws the image on the screen
image(img2, 320,200,300,200); //
image(variable,x,y,width,height)
image(img3, 250,140,150,200);
}
|
You might notice that image #3 is on top of images #1 and #2.
Since image #3 has a transparent background, we see through
the background to see the other images.
Notice that each image requires a variable that is listed in the first line
of the program.
Then each image must be loaded in the setup method.
Finally the images are displayed by the "image" command in the the draw
method.
The image command is very similar to a rectangle command, but it starts
with an image variable.
Do the following practice tasks:
- copy the program, run it and check that it displays the images
correctly
- use Google 3 other images and replace the original images in the
program
by copying the URL of each image into the loadImage commands.
- add more images to make a nice display, using at least 9 images of
various sizes
that fit together properly to fill the window
- find an "animated gif" image and find out whether you can insert
it into your program and get an animated image as a result
Robot Program - 13 Sep 2013
Read pages 34-35 in this book:
Getting
Started with Processing
Here
is
the original robot program.
Homework :
Finish the 4 Robots program, with 4 robots.
#1 - make one robot
#2 - change the program so it uses a robot method (void)
to make the one robot
#3 - change the method to have int x, int y, int s,
and put x,y,s in the right places in the program
#4 - change the setup() method so that it makes 4 robots
in 4 different places with 4 different sizes
Quiz and LOTS of Letters - 12 Sep 2013
1. Do your quiz
2. Keep working on the RAINBOW program.
If you finish, add more letters (methods).
Start with "straight" letters - leave the "round"
letters for later.
More and More Letters - 10 Sep 2013
Now write METHODS for all the letters in RAINBOW.
Then make a program that prints RAINBOW in red
at the top, again in orange below, then yellow,
then green, then blue, then violet. So your program
should print 6 copies of RAINBOW:
|
RAINBOW
RAINBOW
RAINBOW
RAINBOW
RAINBOW
RAINBOW
|
More Letters - 9 Sep 2013
Read these
notes about letter methods with parameters.
Fonts and Letters - 29 Aug 2013
We can use a method to draw any shape we wish.
This is especially interesting if we need many copies of the
shape.
A typical example is letters. We can make a method for each
letter of the alphabet. It's tempting to name the methods
A, B, C ..., but that can cause confusion. It's better to use
names like : letterA , letterB , letterC ...
Of course, if you are making several copies (e.g. writing words)
you will need some parameters that move letters to other locations.
It's also nice to include color parameters.
Here are some more extensive notes on this topic.
The second page is more important - the first page is an introduction.
http://ibcomp.fis.edu/graphics/fonts/index.html
More Faces - 27 Aug 2013
Read
these
notes starting at "More Faces".
Homework : Finish the program that draws 3 faces.

Drawing Faces - 23 Aug 2013
Read
these
notes and do the practice exercises #1-11,
stopping when it says "End of First Lesson".
If you don't get this all finished today,
you need to do the rest as homework
before class on Tuesday.
Test - 22 Aug 2013
Drawing Curves - 19 Aug 2013
Olympic
Rings
and Curves
More Flags - 16 Aug 2013
We will continue drawing flags - read
these
notes.
We will discuss how to fill rectangles with colors
and how to draw a triangle.
First Day - 15 Aug 2013
Today's Assignment
- read
these
notes and do the sample programs up to and including the German flag
- install Processing on your computer before our next class
https://processing.org/download/?processing
- read the notes below as time permits
~~~~~~~~~~~~
|
Welcome to Graphics
Programming
Daily Work - Computers Required -
Bring Your Computer Every Day
Each student needs a computer for
class every day
.. more
..
|

|
Course Description
In Graphics Programming we will be writing programs
that create graphical displays. We will use several
different programming
languages, including Java and JavaScript. ..
more ..
https://dl.dropboxusercontent.com/u/275979/graphics/processingGraphicsTutorial/clickPrimesQuiz.zip
https://dl.dropboxusercontent.com/u/275979/ibcomp/Hanoi.jar