Computer Technology Advanced 2018-19
 
Links:  Processing:    http://processing.org      
         Colors:     
https://www.w3schools.com/colors/colors_picker.asp
         Processing Book:
              http://cmuems.com/resources/getting_started_with_processing.pdf
 
Due Dates :  Fake News Presentation - due 7 June at 18:00         


Finishing Fake News Project - 4 June 2019

Your Fake News Project is due on Friday 7 June at 18:00.
You have 3 more class periods - Tuesday, Wednesday and Thursday.
So you should be creating your presentation now.

For those who did not submit the previous project (Sprites Video Game)
correctly, please do that no later than Friday 7 June.


Fake News Project -  21 May 2019

*** Due Date : 7 June at 18:00 ***

== Assignment ==

Your assignment is to create a presentation about FAKE NEWS.

Product - You may create the presentation using any (or several) of the following tools:
-  Powerpoint or Google Slides
-  Web-pages / web-site
-  Word-processing document(s)
-  a PDF document(s)
-  a video
-  images
-  any online tool that you find useful
-  any other IT tool that you find useful

Use any of the skills that you learned in this class,
or any other skills you have from somewhere else.

Topic - FAKE NEWS
-   
what is it, how does it work, examples and counter-example,
     how to people create it, why does it work, any other related information
-  Why is it important?
-  Who would do this and why?

What to Include

Spend time RESEARCHING the subject (see links below)

Your presentation should include
- actual examples of Fake News that has appeared somewhere
- ideas about HOW this Fake News is created, e.g.
  - pictures (screen captures) of web-sites containing Fake News
  - sample text, with an explanation of why it is "fake"
  - what tool could be used
  - how is the Fake News distributed publicly
  - ideas of who is likely to produce this and why
  - explanations that you wrote

GOAL -
Assume someone has asked you :  "What is fake news?"
Your presentation should be CLEAR, MEANINGFUL, INFORMATIVE,
INTERESTING, EXCITING, ENTERTAINING, TRUE and CORRECT.

Be creative.  Think of something that an uninformed person
would enjoy and learn something by viewing.

Requirement -
You must work together with one partner (a group of 2)
and produce a single project.

Your project must be finished and turned in to Haiku before 7 June 18:00.

You must create your project so that it is easy for the teacher to view it.
For example, don't use non-standard software like Pages. 

Make sure that your product will work on the teacher's computer -
not just on your own computer.  So test it on at least 2 computers.


Fake News Research - 17 May 2019

"What has happened to our language? The Oxford Dictionary’s Word of the Year for 2016 was post-truth, which they define as an adjective “relating to or denoting circumstances in which objective facts are less influential in shaping public opinion than appeals to emotion and personal belief.”"


Levitin, Daniel J.. Weaponized Lies Deluxe: How to Think Critically in the Post-Truth Era (p. xiii). Penguin Publishing Group. Kindle Edition.

=== Investigate ===

Watch this video: https://www.thoughty2.net/how-much-does-a-space-suit-cost-rif-61/ 
Do you believe it?  Why or why not?

Read this newspaper:  https://www.express.co.uk/news
Do you believe it?  Why or why not?

Watch this video: https://www.youtube.com/watch?v=gLoI9hAX9dw
Would this fool you?

Do you "believe in" Global Warming?  https://www.youtube.com/watch?v=McRYTC56DC4

Flat earth? https://www.youtube.com/watch?v=06bvdFK3vVU

Here are some tips about Fake News: https://www.youtube.com/watch?v=nkAUqQZCyrM

-----

We are going to investigate the related phenomenon called FAKE NEWS.
Below are some useful links that might bring some enlightenment.

Finding Truth Among Lies

Where Fake News Comes From

Creepy Clown Conspiracy

How Fake News Grows

Moon Landing Conspiracy

Fact Checking the News

Is this fake news?

Finding Truth in a Post-truth world

The Future of Lying

History of Fake News - Fit to print?

How to Spot Fake News

Facebook : Tips to spot fake news

Fake Photos Quiz

Video Games Will Make Us Smarter

http://gizmodo.com/69-viral-images-from-2016-that-were-totally-fake-1789400518

https://www.wired.com/2016/12/photos-fuel-spread-fake-news/

https://www.wired.com/2017/02/internet-made-fake-news-thing-made-nothing/

=== Project ===
Next class, you will receive specific details of what you are supposed to PRODUCE
at the end of this project.  Spend this class period INVESTIGATING the topic of FAKE NEWS.

Work in pairs - groups of 2 students.  If you prefer working alone, you may do so,
but you need to produce the same quality project as the groups produce.

You will have 3 weeks to work on this project, although you may miss some classes
due to trips or exams.

Consider the following questions:

-  What is the difference (or similarity) between FAKE NEWS and the following:
    - A mistake
    - An advertisement
    - Propaganda
    - Exaggerations
    - Pseudo-science
    - Falsified data
    - Misunderstanding
    - Truth
    - Lies
    - Impartial journalism
    - Incomplete reporting
    - anything else that is similar to FAKE NEWS

-  Are there FAMOUS EXAMPLES of FAKE NEWS that fooled lots of people
   and had significant effects on society?

-  Are there specific people or organizations that create FAKE NEWS
   to achieve a specific purpose?

-  What IT and Computer Technologies have encouraged or increased
    the effectiveness of FAKE NEWS?  How does this happen?

-  Are there tools that are actually intended for
   the production of FAKE NEWS?
   -  Can you find such a tool and learn to use it?
   -  Can you create an example of a FAKE NEWS WEB-SITE that is
       effective and might fool someone?

-  Are there ANTI-FAKE-NEWS computer tools/systems
    that attempt to identify/prevent/destroy FAKE NEWS?
    - Can you install software on your computer that you can use
       to fight against FAKE NEWS?
    - If you create a sample FAKE NEWS WEB-SITE will this be
      detected by ANTI-FAKE-NEWS tools?

-  Is FAKE NEWS illegal?
   If so, under what circumstances can the author(s) be punished?
   And how would they be punished - how severely?

Google Sites Experiment - 16 May 2019

Look at this web-site :  https://sites.google.com/fis.edu/experiment/home

Follow the instructions on the HOME page.

Web Page Details - 15 May 2019

Here are some experiments you can do with web-pages.

(1) Use GOOGLE SITES to create a web-page.
     Write your NAME at the top of the page in
    VERY LARGE TEXT.

(2) Insert an image - anything from Google Images.
     Then SAVE your web-page and PUBLISH it.

(3) Use this web-site tool https://www.qrstuff.com/
     to create a QR code for your Google Sites page.
     PRINT your QR code and use your Smart Phone
     to check that it works

(4) Use https://tiny.cc/ or some other URL shortener
     to make a short-cut address to your web-page.

(5) Insert a Youtube video into your web-page.
     PUBLISH the page and check whether it works
     in your SmartPhone.

(6) Use a tool like this . https://logomakr.com/6E0EmZ 
      to create a small logo for your web-site.

(7) Try out any of the other tools in Google Sites.

Finish Video Game - 13 May 2019

Finish your Sprites game today and turn it in before 18:00.
You must COMPRESS the folder that contains the program and all your images.  
Then upload the .zip archive into Haiku.

Continue Video Game Project - 6 May 2019

Due to the missed classes last week, the due date for the Video Game Project
is changed to :  due Mon 13 May at 18:00.

Continue working on this project during classes this week.

Sprites Video Game Project - 15 Apr 2019

Here is a more interesting example game:  CookieMonsterB

Sound Effects
If sound is not working on your computer, you can try the following:
- open the [Tools] menu and choose [Add Tool]
- Click on [Libraries] and choose [Video] and then [Install]
That should install the Video library so that "import processing.video.*" works.
After that, the sound commands should work.  If they still don't work,
you can create your project without sounds, or get help from the teacher.

=== Project - Sprites Video Game Assignment ===

Your assignment is to make a 2-D video game, using the Sprite library in Processing.

Your game is due on Mon 13
 May at 18:00.

Your game MUST :
- use the Sprite library
- do NOT use any of the pictures or animations 
     that were provided in the CookieMonster examples -
      find your own pictures and animations and use them

- include a PLAYER object that is controlled by the keyboard
- keep score somehow
- include two or more ENEMY objects
- include several FRIEND objects (e.g. food, power-ups)
- include some objects that move around the screen automatically
- include at least 2 objects that display ANIMATIONS -
  that you created by converting (or drawing) single frames
- lose points or lives when an ENEMY is touched
- gain points or lives when a FRIEND is touched
- use all of the following commands sensibly:
  -  setSpeed
  -  place
  -  show
  -  hide
  -   (optional) add sound effects

To get a top grade, you should
- make a game that is fun, interesting, and winnable
- make a game that is not boring or too easy
- include enough objects to make things interesting and/or exciting
- use attractive or interesting or effective graphic images
- make it possible to win, but not TOO easy

Be CREATIVE!  Be INVENTIVE!  Take RISKS!
But finish on time.  You have 7 class days to complete this.
If something isn't working, ask a question and/or get help
before you waste a lot of time.

GIF Animations - 11 Apr 2019

There are notes near the bottom of the Sprites notes:
processingGraphicsTutorial/Lesson06-Sprites/CookieMonsterApplet/index.html

Use this web-site:

Sprites Library - 9-10 Apr 2019

INVESTIGATE the following program (the teacher will help):
http://ibcomp.fis.edu/275979/graphics/processingGraphicsTutorial/Lesson06-Sprites/CookieMonsterApplet/CookieMonster.zip

INVESTIGATE means
- run the program and figure out how it works
- read the program and try to understand the commands
- make simple changes to see whether you really understand the commands
- make ADDITIONS, for example another Sprite (picture)

Here are complete notes about the Sprites Library:

processingGraphicsTutorial/Lesson06-Sprites/CookieMonsterApplet/index.html

Do the practice exercises at the end of these notes.

Next class, we will look at a more interesting example
and start a project that we will work on for the next 2 weeks.

Moving Objects and Collisions - 5 Apr 2019

This Blue Blob Program uses very simple tricks
to find out when a player has touched a target.
Download the program, try it out, then
read the notes at the bottom and do the 
practice exercises.

Moving and Keyboard Controls - 4 Apr 2019

Read these notes and do the practice exercises:

House Quiz - 3 Apr 2019


Letters - 1 Apr 2019

- Choose a 3 letter word, like CAT
- Write a method for each letter, for example:

   void A(int x, int y)
   {
       line(10+x,100+y,50+x,10+y);
       line(50+x,10+y,110+x,100+y);
       line(40+x,80+y, 170+x,80+y);
   }

- in the void setup() section, write a loop to print one letter 10 times in the top row
- write a loop to print the second letter 10 times in the 2nd row
- write a loop to print the 3rd letter 10 times in the 3rd row, like this:

 C C C C C C C C C C
 A A A A A A A A A A
 T T T T T T T T T T

== TEST REMINDER ==
We will have a test on Wednesday.  You should bring
any written (or printed) notes you wish to use, 
as well as any useful programs that you have completed.
You may use your notes and your own programs,
but you will not be permitted to use the Internet -
e.g. you cannot open the teachers web-site or notes.
Be sure you are prepared to do any or all of the following:
- draw a flag
- draw an icon
- draw a letter
- draw a house
- write a method to draw a face or a letter or a rabbit
- write a LOOP to execute a method many times

Finish the House - 29 Mar 2019

Finish the house today.  
Be sure to SAVE the program, as you will need it
for your test next WEDNESDAY.

Add a couple more things:
- be sure you have a yellow sun up in the sky
- add a blue rectangle to make the sky blue.
  this needs to be in the background, not on top of the sun
  so you need to draw it FIRST
- put a bunch of BIRDS in the sky - use a LOOP and a METHOD
- put something in front of the house,
  like a kid playing or a bicycle or something -
   this should overlap the house, in front,
   so you need to draw it LAST

Drawing a House -  28 Mar 2019

First, we will review the 3x3 faces program,
and see how to draw this more easily with LOOPS.
Then we will draw a house.

== Test Announcement ==
We will have a test on Wednesday 3 April.
It will be open book, open notes,
use anything you have written before,
including programs that draw specific things.
But there will be NO INTERNET ACCESS,
so bring whatever you need with you,
stored on paper or on your own computer.
You will have a specific programming task 
to accomplish in 45 minutes.

== The HOUSE ==

A HOUSE can be drawn using:
- a rect (rectangle) for the front
- a rectangle and two triangles for the roof
- a rectangle for a door
- a rectangle for a window
- an ellipse for the sun
- a big green rectangle for the lawn
- lots of RABBITS on the lawn - use a loop and a method

Methods for Faces - 26 Mar 2019

Today we will do the programming practice about Methods, until the 
=== End of Second Lesson ===

void setup()
{
  size(400,400);
  grimFace(50,100,0,200,0,200,0,200);     //green
  grimFace(-50,100,250,200,50,120,65,6); //yellow
  grimFace(-50,0,0,0,200,200,200,200);      //blue
  grimFace(50,0,237,129,12,0,0,0);   //orange
}

void grimFace(int x, int y, int r, int g, int b,
               int r2, int g2, int b2) // method
{
   stroke(0,0,0);
   strokeWeight(1);
   fill(255,255,255);
   ellipse(100+x,50+y,100,100);
   fill(r,g,b);
   ellipse(80+x,40+y,20,20);
   ellipse(120+x,40+y,20,20);
   strokeWeight(5);
   line(100+x,40+y,110+x,60+y);
   stroke(200,0,0);
   strokeWeight(10);
   line(80+x,70+y,120+x,70+y);
   stroke(r2,g2,b2);
   strokeWeight(20);
   curve(40+x , 60+y, 80+x,10+y,120+x,10+y,150+x , 60+y );
}

=== HOMEWORK ===
Finish the 3 rows of 3 faces.  

Curves and Faces - 25 Mar 2019

Read the following notes and do the practice exercises
Finish up to === End of First Lesson === before class on tomorrow.


Continue Icons - 22 Mar 2019

Continue writing Java programs to draw ICONS (little stick figures):

You should finish these notes before our next class.
You should complete the Olympic rings and at least 4 icons.

Icons in Java - 20 Mar 2019

Lesson 2 - Olympics 

  http://ibcomp.fis.edu/275979/graphics/processingGraphicsTutorial/Lesson02-OlympicRings/Lesson2-Olympics.htm

Work on DRAWING ICONS, especially with LINES and ARCS.

Finish half of this today - you can finish the rest on Friday.

More Flags in Java - 19 Mar 2019

Continue with the flags notes - read these notes about FLAGS -
starting with the Congo flag, then continue through the notes.

Java in Processing - 18 Mar 2019

We are going to learn to write programs in Java, by using Processing.
Java is arguably the most popular programming language in the world,
and is the language used for writing Android Apps.  We won't be writing
Android Apps, as this is rather difficult.  Instead, we will use a simplified
version of Java called Processing (download at http://processing.org).

The teacher will demonstrate how to use Processing.
Then start Processing and do the exercises described in the following notes:
 read these notes about FLAGS and do the sample programs up to and including

        #1 - German flag

        #2 - Austrian flag

        #3 - Belgian flag

  The programs in those notes will run in Processing
  from http://processing.org after downloading and installing the program.
  Alternatively, you can run the code directly in the following web-page
  without installing anything : http://sketchpad.cc .  But that is not
  a good tool in the long run.  Install the local version as soon as possible.

iMovie Tricks - 7 Mar 2019

The teacher will briefly show how to do some specific tasks in iMovie, specifically:
- how to cut out a small clip from a video
- how to put text into your video
- how to make transitions between clips

You might also find this video helpful:

If you are already a competent iMovie user, then you should start
- downloading your source videos
- importing your source videos into iMovie
- cutting out some clips and start assembling your video TIME LINE


Video Research and Investigation - 6-14 Mar 2019

You will be making a short video (under 2 minutes) about a news event.
You will use iMovie to cut out short video clips and paste them together.
But before you start DOING this, you need a PLAN, and before you make
a plan, you should INVESTIGATE what is available.  

Your assignment is to produce a video slideshow/video clips like these:

      Cory Montieth   https://drive.google.com/file/d/15x3O1xeWcSOZCxVv96PLNnauzTgcVySf/view?usp=sharing

      Fukushima Earthquake and Tsunami  http://www.youtube.com/watch?v=o1015uv_A-o 
        (a good start, but needs more TEXT with more info)

      9/11 World Trade Center   
https://www.youtube.com/watch?v=MNyjZJOEXpE

Your video must illustrate ONE NEWS EVENT or ONE STORY that happened in the year 2018/19.

This may be any story that is in GOOD TASTE.  Your story should not be about Donald Trump,
as there is actually TOO MUCH information available.  Anything else is fine, as long 
as it is in GOOD TASTE.

Spend today (in class and some homework) to locate suitable RESOURCES
for your video.  You are looking for VIDEO REPORTS (probably on YouTube)
about your topic - the topic may still be uncertain today, but you will need to
decide early so you don't just waste time watching random videos.

The teacher will show you some sample projects from previous years,
so you understand what you are aiming for.  Today, look for CLEAR
and INFORMATIVE videos about a topic that might interest you.

When you find a good source, you should BOOKMARK that web address.
You can copy the address into a document, or you can bookmark it
in the browser on your computer.

Eventually, when you have found some good sources, you will need to
DOWNLOAD the videos.  A good tool for this purpose is probably:
https://www.onlinevideoconverter.com/youtube-converter
This works without installing any software on your computer,
and Norton Security says it is safe to use (not all video download sites
are safe, or even reliable).  But be sure to also save the URL address,
not just download the video, as you must list all the sources at
the end of your video.

Tomorrow, we will look at some of the TECHNICAL DETAILS
involved in this project, particularly some details about how
to use iMovie successfully.

You will have 6 class day to do this project.  A sensible plan is:
Day 1 - investigate the story and look for video sources
Day 2 - collect some sources into iMovie and write a STORY BOARD
              of what clips and information you want to include
Day 3, 4, 5 - cut out clips and paste them together to make a video
              Use short clips - you must have at least 12 clips
Day 6 - decorate your video with TRANSITIONS and TEXT screens
             Be sure to include your NAME and SOURCES at
             the end of the video. Clean up any problems and turn in your video

This project is due on Thur 14 March at 18:00.
You may need to work at home as well if you are not familiar with iMovie
and it takes longer than you expect.


Billboards for Images - 25 Feb 2019

The teacher will show how to create a Billboard picture in Alice.


Alice Story Project - 13-15 Feb 2019

Your assignment for the next 7 classes is to make an ALICE program
that illustrates a famous historical event - an event that occurred before 1915 -
e.g. before World War I .

Read a description of the assignment here.

This project is due Tuesday 5 March at 18:00.

To turn in your project, you only need to upload
one single file into Haiku - the file ends with .a3p

Cameras and Vehicles in Alice - 12 Feb 2019

Today - we will look at CAMERAS and VEHICLES:
Make a new story world.
Add a vehicle, like a truck or boat or plane.
Add 2 characters that should "sit" on the vehicle.
Use setVehicle to attach the characters to the vehicle.
Make the vehicle move and check that the characters stay with it.
Make the camera spin around to the back of the vehicle.
Try to attach the camera to the vehicle via setVehicle.
Make the vehicle move around and check that the camera follows it.


Scene Change Tutorial - 11 Feb 2019

We will try to work through this tutorial:
This is rather long and difficult, but it shows clearly
how to put multiple scenes into a Alice story.
You should try to follow the instructions VERY CAREFULLY.

Practice - 6 Feb 2019

Practice with Alice.  Take any of the assignments from
previous days and add more things -
more characters, more movements, etc.

** QUIZ TOMORROW - Thu 7 Feb **

Dancing - 5 Feb 2019 

****************************************************
*** Keep Learning and Practicing                ***
*** We will have an in class programming   ***
*** QUIZ on Thursday 7 Feb 2019.             ***
*** You will need to do a similar task           ***
*** like the practices you have been doing  ***
*** and then show the result to the teacher ***
*** after 30 minutes.                                     ***
****************************************************

Today we will work on this sample story:

In this story, the 4 small tigers move in a variety of ways,
sort of like a dance.

(1) Change the first tiger to use [Do Together] so that his
arms and head all move together, at the same time.
Then add more commands to make the arms turn down again.

(2) Change the second tiger so he jumps up into the air
at the same time (DoTogether) as he is moving his arms.
Then he should move back down to the ground
as his arms turn down.

(3) Add commands to make the SnowWoman do a "dance",
moving her feet and her arms.

(4) Make the ShowMan do some acrobatics, like jumping into
the air and then landing on his hands, and the bouncing back
to his original position.

(5) Try putting a bigger [DoTogether] around the first 2 tigers,
so they do their "dance" at the same time.

(6) Try putting a [DoTogether] around all the commands for Tiger #4.
Then he should jump up and turn at the same time.  You may
be surprised at the result - it's not what you expect.

(7) Add a new character and make it dance, too.

Loops - 1 Feb 2019

By using LOOPS, we can REPEAT commands without dragging lots
of commands to the story board.

Download this sample story:
You will need to uncompress this before opening it.

- RUN the story and watch the monkey hopping around

Now the monkey should eat the second banana, 
but it doesn't hop far enough, and it doesn't bend over.
- Increase the number of hops to the correct amount
- Add TURN commands to make it bend over and eat the banana
   and stand up again

Now at the end of the story
- Add one more banana, make the monkey turn toward the banana
- Write a LOOP to make the monkey HOP to the banana
- Make the monkey bend (roll) down to "eat" the banana
- Make the monkey stand up again, and make the banana disappear

So now the monkey should eat 3 bananas, one after another.

Now make the monkey run away into the background, far away.

IF YOU FINISH EARLY (which is likely) 
then go to the Alice Tutorial site, find an interesting tutorial,
download it and make some useful changes

Moving Around - 31 Jan 2019

Any object in Alice can move, in a variety of ways:
  move - up, down, left, right, etc
  turn
  roll

For practice:
- make a new world
- put a TARGET in the world, like a CAULDRON
- put 3 Objects (characters) in the world
- make one of the characters move to the CAULDRON and then disappear
- make the second character move up (jump) then move over to the CAULDRON,
   then move down into the CAULDRON and disappear
- make the 3rd character RUN AROUND the CAULDRON.
   That means it move to the left, then back, then to the right, then forward,
     ending at its starting point
- Now add a ROCK or something like that.
   When the 3rd character is finished, the rock should APPEAR
     above the character, and then fall down and hit him.
      Then both the rock and the character disappear.

Alice 3D Worlds - 30 Jan 2019

Download and install Alice 3.0 from:   www.alice.org
or get a copy on a USB stick from the teacher.

We will work on this tutorial:

Videos - the videos are very clear and short, you might want to watch some of them.

The step-by-step tutorial is in this PDF document:

Here is a brief summary (follow these steps or the PDF tutorial):

- Click on [Setup Scene] and open the FANTASY object library
  Insert some background objects, like the CASTLE objects
  Insert at least 2 CHARACTER objects in front of the background objects 
       (maybe a witch and a dragon)
  Insert a CAULDRON object in the very front
- Return to [Edit Code]
  Click on a character and make it say something
  Click on the CAULDRON and make it Turn around 4 times
  Make one of the characters disappear, then wait, then re-appear
  Make a different character jump (move up) then ROLL then move back down
  Make the jumping/rolling character say something
- Make one of the characters move its arm or leg or some other body part
- Make the CAMERA move backward - e.g. zoom out
- Make all 3 characters move away, in 3 different directions

Now add more actions BETWEEN the existing actions.

Gizmos - 24-28 Jan 2019

== HOMEWORK ==
Download and install Alice 3.0 from:   www.alice.org

A GIZMO is a set of points and shapes that changes interactively.

Here is an example that you can build :
-  make a triangle from 3 points
-  make a circle through the 3 points
-  make a square with one of its sides on one side of the triangle

Then solve these challenges:
- move one of the 3 points until you have a right triangle (containing a 90 degree angle)
  How do you KNOW that it is exactly 90 degrees?
  How large are the ANGLES in the triangle?
- move one of the points until you have an EQUILATERAL TRIANGLE
  How do you KNOW it is equilateral?
  What is the RATIO of the square's area to the triangle's area?
etc.

BEFORE you start, you need to DOWNLOAD Geogebra (graphing calculator).

== Assignment ==

Make an INTERESTING Gizmo, with at least 4 different objects that are connected.

Add TEXT that explains the challenges.

SAVE your gizmo (it will be a GGB file).

Upload it into Haiku.

If you do your work online (at geogebra.org), you can DOWNLOAD
your project to a ggb file and upload that.  But this approach is 
clumsy and makes LOADING difficult.  So it is better to download
the program and work locally.

== DUE  Mon 28 Jan at 18:00 ==

More Geogebra Practice - 22 Jan 2019


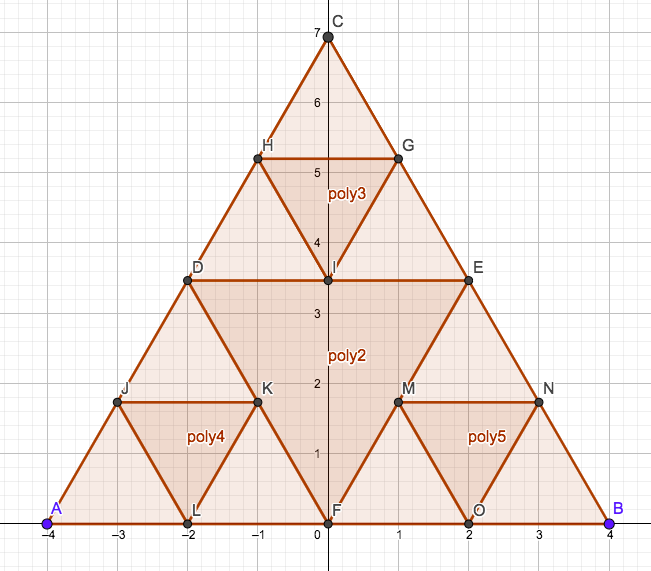
Construct this picture.  You must make the triangles EXACTLY right,
or at least as close as possible (the letters marking points don't matter).
It is made using REGULAR POLYGONS.


Now WRITE DOWN the steps used to create the picture - 
e.g. what buttons did you push?

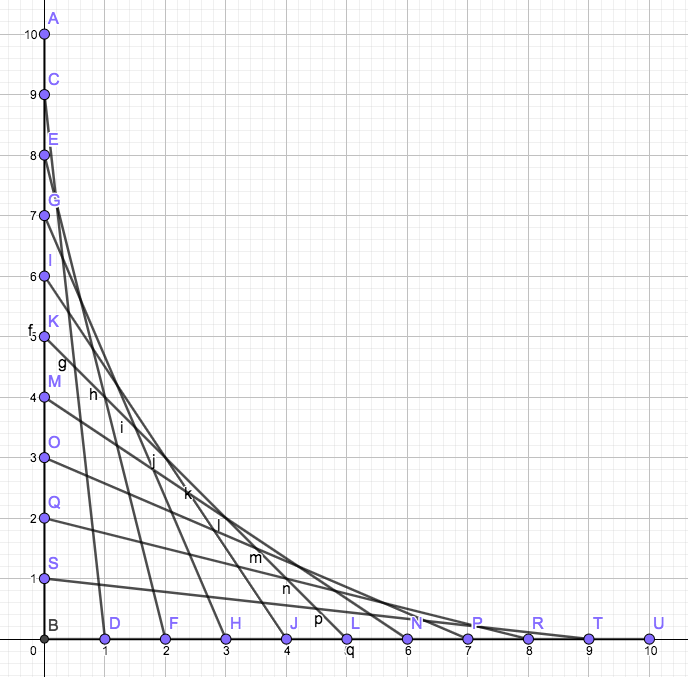
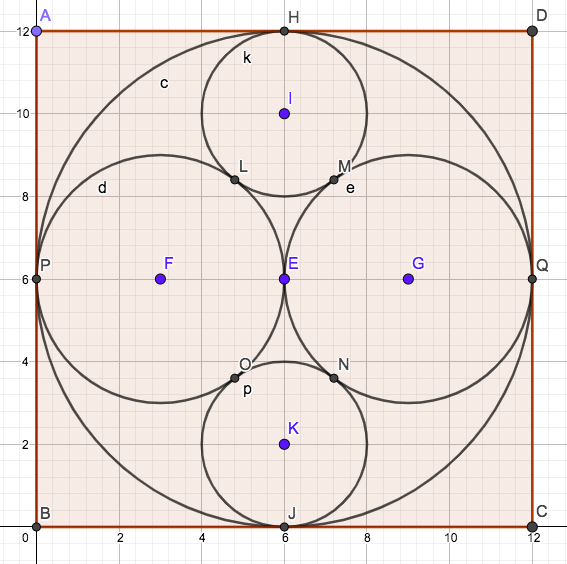
Construct each of the following pictures - then WRITE DOWN THE STEPS
used to construct each picture.

This picture is made with SEGMENTS - 11 altogether:


This picture is made with 5 circles inside a square.  The circles are TANGENT to each other.


 .       

Math Illustrations - 18-21 Jan 2019

Rich Math Problems

Desmos
for example:

Geogebra
for example:


Wikipedia

=== Practice ===

(1) Use the Polygon tool to draw a square with corners at:
      (-3,3) , (1,6) , (4,2) , (0,-1)

     Find the AREA of this square by typing:  Area(A,B,C,D)

     Find the LENGTH OF THE DIAGONAL by typing:  Length( Segment( A , C) )

     Check that diagonal B,D has the same length as A,C

     Move corner A  until the area is 23

(2)  Draw a square with corners at:
       (-4,0) , (-4,8) , (4,8) , (4,0)

      On top of this square, draw an OCTAGON (8 sides)

      Find the area of your Octagon

      Delete (erase) the square.

      Now find the lengths of the sides of the OCTAGON.

      Move the corners of OCTAGON until all sides are the same length.

(3)  Create a PENTAGON (5 corners) with all 5 sides having equal length.

      Then check that ALL the ANGLES are the same size.

      Is there an EASY function for creating this REGULAR PENTAGON.

(4) Draw an EQUILATERAL TRIANGLE - with all sides equal.
     
      Calculate the area.

      Mark the MIDPOINT of each side.
      Now use the 3 midpoints to create a smaller triangle, inside the original.
      
      There are now 4 smaller triangles.  Create the midpoints of each side of each triangle
       and connect these making 4 new smaller triangles, and then there are a total of 16 triangles.

(5) Draw a smiley face, using a circle for the head,
      two circles for eyes, and an ARC for a smile.

=== What makes web-sites good or bad? ===

Error messages = bad

Small text = bad

Huge text = bad

Colored = usually good

Just text = boring

Graphics = good

Voice = good

Animation = good

Easy to navigate = good

Minecraft = mixture of words and pictures

Well organized = good

Attractive = colors

Free = good

Search bar = good

Secure (safe) = good

Ads = mostly bad


Test and Starting Math Tools - 15 Jan 2019

(1) Do your test, turn it in

(2) HOMEWORK - spend 20 minutes investigating some of these Math Tools:
Try out the tools, write some brief notes and bring questions to class tomorrow.

Study for Test - 14 Jan 2019


Study for your test - read these answers to your investigation questions:

Google Servers and Big Data - 10 Jan 2019

Google Data Center Video

What is "Big Data"?  Why is this important in the world?
Why is it important for YOU?

How Google Works - 8 Jan 2019

We will investigate how Google works.
Investigate and answer the questions in these notes:

You may work together with another student to find the answers to these questions.

This is a LEARNING exercise, more than a DOING exercise.  You are supposed to investigate
these questions, find the answers, learn the answers, and prepare for a WRITTEN TEST -
TEST on Tues 15 Jan 2019.  The test will consist of multiple choice and short-answer questions

Board Game - 10-13 Dec 2018

To turn in your board game:
- copy everything into one folder on one computer
- compress the folder
- give a copy of the .zip archive back to each member of the group
- ALL students must upload their game into Haiku
- ALL students in the group will receive the same grade
  IF they upload the game into their Haiku account

Tips for BoardGame - 3 Dec 2018

Here are a couple tips for your board game.
The teacher will explain the code.

Board Game Project - 28 Nov 2018

We will work in GROUPS (3-4 students) to
make a BOARD GAME in a Web page.


This project is due on Thursday 13 Dec.

This will be grade according to the instructions (above).
Also, it will be assessed according to how ENTERTAINING
it is.  That does not mean silly, but rather the content
should be interesting, educational and challenging.

And the activities should be INTERACTIVE whenever possible -
that means the computer does something, then the user does something,
then the computer does something, etc.  It is not very interesting
if the computer simply displays a picture.

GROUPS
 Gabe, Aaditya, Tim, Yoshiki
 Luise, Ettienne, Petr, Patricio, Alex
 Finn, Gabriel, Liam, Gonzalo
 Irfan, Carlos, William, Julien
 Theo, Noel, Ben, Mohit


How to Do It :
-  Roll dice = Random Number

   <button id=dice>Dice</button>
   <script>
    dice.onclick = function()
    {
       num = Math.floor(Math.random()*6) + 1
       alert(num)
    }
    </script>

- Put a picture of the player in each different square

      <div id=b15 .....>
      <script>
           b15.onclick = function()
           {
                 b15.innerHTML = "<img src='player.jpg'>"
           }
      </script>

       It is a bit trickier than this.  You also need to REMOVE the player image
       from the previous square.

Exploring Games - 27 Nov 2018

   Watch this video featuring Jane McGonigal:
   https://www.ted.com/talks/jane_mcgonigal_gaming_can_make_a_better_world
Today please test any or all of the following games.
While playing each game, ask yourself:

  "Is this game bringing out the best in me?" 

On that basis, decide whether you find each game good, bad or medium.

http://explorers.mrdonn.org/games.html

http://www.coolmath-games.com/

http://www.gamesforthebrain.com/

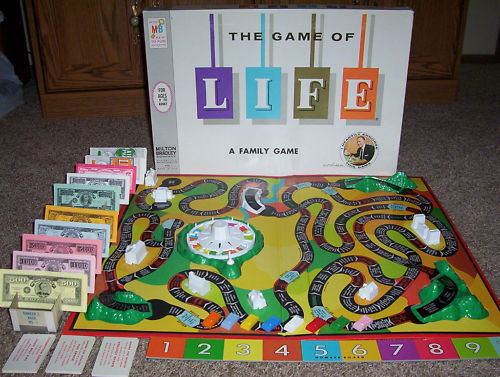
We will be making a Board Game - like the Game of Life.  
Maybe you will also get some good ideas from the games above.


Finish Calendar - 26 Nov 2018

You should finish your calendar and turn it in by 18:00 today.  In case you need more time, you may turn it in later this week, but we will not spend any more class time on it after today.


Calendar Project - 19 Nov 2018

Look at this sample calendar page:

You already made a Calendar Page last class.
Now you should add LINKS to at least HALF of the days.
Each link must be sensibly connected to the date it is in,
for example a famous Birthday, the anniversary of a famous event,
an advertisement for an event that will occur in the future, etc.
Add some text in the day indicating what it is linked to.
Also add a couple interesting image - like the Santa animated .gif -
around the sides of the calendar.  Be sure that you have the
name of the month and the year at the top of the page -
and check that your calendar starts on the correct day of the week.

You have 3 class periods to complete this - due on Monday 26 Nov at 18:00.  
Make sure that your page is in a FOLDER, and the folder
must be COMPRESSED, and then you upload the .zip file into Haiku.


Using DIVs - 16 Nov 2018

We are going to make a calendar.  
We will need a box for each day, covering one month.
Here is sample code for a few days:


  <div style="position:absolute;left:300px;top:50px;width:100px;height:100px;background:rgba(100,200,250,1)">1</div>
<div style="position:absolute;left:400px;top:50px;width:100px;height:100px;background:rgba(200,200,100,1)">2</div>
<div style="position:absolute;left:400px;top:150px;width:100px;height:100px;background:rgba(250,100,0,1)">9</div>


You should make an entire month today.  Choose any month in 2018 or 2019 - maybe the month of your birthday.
Make sure that the boxes fit together properly.  Finish the entire month today - you will need
to use it for what we are doing next class.  Notice that your chosen month probably
does not start on Sunday (or Monday), so the first div (for day 1) will probably
be somewhere in the middle of the screen.

You may find this color picker tool helpful: http://htmlcolorcodes.com/color-picker/


Sound Effects / Audacity Practice - 13-14 Nov 2018

Today and tomorrow, make an Aesop's Fable story with sound-effects.
-  download an Aesop's Fable audio track from
- cut out a single story, probably about 1.5 minutes
- save the single story
- find sound-effects (suggest http://www.findsounds.com/)
  The sound effects must fit sensibly with the story.
- Insert each sound-effect into the correct place in the story
   Add at least 5 sound-effects.
- Now ADD a musical background.  When you do this, make sure
   the background isn't too loud and not too quiet - it should be
   audible, but should not interfere with the spoken story
- SAVE your project frequently
- When finished, you must EXPORT your project as an audio file.
   The BEST format is .WAV, which works almost everywhere.
   If you CAN export .mp3, that is a good choice, too.
- Once your audio file is finished, you turn it in to Haiku
   You can just upload the audio output file - no need to compress it.


Sound Effects in Audio Books - 12 Nov 2018

We will use 
to edit a file like this one:

The file above is from this site:

We will split up the file, keeping a single story, and then add sound-effects like this example:

A good place to find and download sound-effects free is : 
You can find lots of sound-effects libraries on the web,
but you should NOT register and pay for them.

Sound Synthesizers - 8 Nov 2018

Here is an introductory video about Audioblocks:

Try out the Audioblocks sounds:

Unfortunately, Audioblocks is not free.  

Here are some free sound-effects sites:

Epic Wins:

There are lots of music/sound libraries on the web that allow free downloads.

== Practice ==
Try to find (and download) the following sounds:
-- a scary scream
-- a loud laugh
-- a siren
-- an animal sound
===========

Here are some music MAKING tools to try out.

Search for one that is easy to use and creates good results.

For Beginners - very simple

http://readonlymemories.com/

Play Drums from the Keyboard

Lots of Tools (find the best one)

Or find a good tool yourself - search for [drum sequencer online] or [music creator online] or something like that.

Try out various tools and try to make an interesting/exciting music loop.
Share it with your friends.

Starting Monday, we will be mixing some music using Audacity.
You should install Audacity on your laptop before class on Monday.

https://www.audacityteam.org/download/

Printing Funny Pictures - 6-7 Nov 2018

-- Today --
Investigate some of the tools on this page:
http://www.hongkiat.com/blog/25-websites-to-have-fun-with-your-photos/

If you use a face, it must be YOUR face or a famous person from Google Images.
You are NOT ALLOWED to use a photo of a friend or someone at FIS.

The pictures should not be offensive - rather, they should be funny or entertaining or amazing.

Make some funny pages, print them, put your name on the pages and hand them in to the teacher.
The teacher will post some of them on the walls in our classroom.

Try to bring a picture of your face to use.

== GOAL ==
Print 4 pictures (pages) using at least 2 DIFFERENT TOOLS.
Collect all 4 pages and turn them in to the teacher by the end of class on Wednesday.
On the back of each printed page, write your name and the name of the
web-site that you used to create the image.
All pages must be created by one of the web-sites listed on
- e.g., do not use Photoshop or Google Draw, etc.
All the pictures must be printed on a COLOR printer.
If you wish to work at home as well, that is of course permitted.

== Due Date = 
Wed 7 Nov before 15:10

Printing - Tips for Students
  • Use the Print Preview feature to see how a document will print. Only print when satisfied with the preview.

  • When printing PDFs, save the document to the desktop, then print. 

  • Print PowerPoint slides as "handouts" to print multiple slides per page. 

  • Email or bookmark website URLs rather than printing them. 

  • Scan reading materials to your computer, tablet or smartphone. 

  • Create online accounts in Library databases to save research and searches. 

  • When making changes or corrections to a document, only print pages containing corrections.

  • Do not resend a print job if it doesn’t immediately print. There may be other jobs ahead of yours in the queue or the printer may have run out of paper. ITS consultants can help.

  • Remember to log out of any programs and shut down the computer in a public computer lab or the Library to prevent others from using your accounts

Outdoors Project - 26-31 Oct 2018

Continue working on your Outdoors gif animations project.

Remember the project is DUE on 1 Nov at 18:00

Create a web-page that has an OUTDOOR theme.
The page should have decorations like trees, flowers, rocks, etc.

The page must also have lots of animals moving around, simultaneously.
The animals should all be .gif animations, so parts of their bodies are moving -
like legs are moving, wings are flapping, etc.  

There need to be at least 3 different .GIF animations.
That is enough,  but you should have several copies of each
running around on the screen.

You must also add some sound-effects - at least 3 sound effects.
You may also add background music if you wish.
The background music may "loop" forever if you wish, but the sound-effects
for individual animals should each stop after it runs once.
It might start again later, but not play forever.

The page should just keep running forever - after it starts.
To get a top grade, your page should have lots of animatls that
fit together - not random silly images.

More images are better than fewer - not one fly, but lots of flies.
Animals should move in a variety of directions, at various speeds.
At least 3 of the animals should use .transform = 'rotate...' or 
.transform = 'scale..' so that it turns in the correct directions 
when it moves. Most importantly - the animals must all move in 
a "loop" (not a circle), meaning that it moves somewhere, then moves 
back to where it started and then repeats over and over again.

Sounds and Outdoors - 25 Oct 2018

Download this .zip file, uncompress it, and open flyer.html in Komodo:


This project is due on Wed 31 Oct at 18:00

Moving with Rotation - 24 Oct 2018


We will do what the instructions say.

Animations with Javascript - 22 Oct 2018

You can download the entire folder here:
http://ibcomp.fis.edu/2018/comptech/animations.zip

Today you can put your .gif animations from last week
into a web-page.  

Animations - 18-19 Oct 2018

Spend 2 class periods on this practice assignment.

It's pretty easy to make your own "Smiley" GIF animation.

You may wish to GROUP some pieces, like the pieces of the face,

so they can be easily moved around together.

    RockingSmiley.gif          

You'll probably find it easier if you make it pretty big, like 200x200 pixels.

Now make your own smiley GIF animation.

Recommend using Google Draw for the drawings.

Start with a basic face and export/download it as a PNG image.

Then make a small change and save a second image.

Another small change, then save a third image.

It would be smart to NAME the images pic1, pic2, pic3, etc.

Then use this online tool for making the animated GIF.

The teacher will show how to use these tools to create a Smiley.

Then you can practice. Make a simple one quickly,

so you learn to do all the steps (there are many steps).

Then, if time permits, make another nicer one.

(1)  Make a Smiley, similar to the above.
       Use at least 6 frames.
       Upload your 6 frames to the Animated GIF tool.
       Then upload them again and REVERSE THE ORDER.
       Preview the result and download the .GIF animation file.
       Then open it and view it in a browser.

(2) Make a squashing word similar to the NEW animation above.
      But use a different word - at least 3 letters.
      Make the letters "squash" as they get to the bottom.
      Again use the Animated GIF tool to change your frames into a .gif animation.

(3) Make an animation of something that is rotating, growing and shrinking.            


Rube Goldberg Machine - 9-17 Oct 2018

Watch this video : https://www.youtube.com/watch?v=IMboI4cOAuQ 

Click here ==>  This is fun, but DON'T try to build this.

Rube Goldberg Machine Project  -  DUE 17 Oct 2018 at 18:00

Your assignment is to make a page similar to this one: 
http://ibcomp.fis.edu/275979/graphics/javascript/RubeHack/RubeHack.html

Below are a list of Rube Goldberg Machine ideas that turned
into projects that won a yearly contest.  You may select
one of these ideas, or make up your own, as you wish.

Build it Backward

Your assignment is to make a WEB-PAGE with a Rube Goldberg Machine.
There should be a [Start] button that starts a sequence of actions.
Each action will involve some object moving and touching another object -
then that will start the second object moving.

The best way to approach this is to start with one of the ideas below.
Make a web-page where that one single action happens.
THEN add the action that comes BEFORE that action, and triggers it to start.
Then add another action before that, etc.

Keep It Reasonably Simple - BUT INTERESTING!

You are not expected to create something as complex as the little
boy in the video. But your web-page version should have a picture
that moves and hits another picture, then it moves and hits another, etc.

You must use many Slide and setTimeout commands to create one
moving action after another.  You might also want to use VISIBILITY
to make objects appear and disappear.  You might want to change
the width or height to make an object grow or shrink.

Totally realistic actions are quite difficult.  For example, a hammer hitting
a nail should actually have the hammer rotating.  But you can keep it simple
by having the hammer just move down and up.

How Much is Enough

Let's say that the finished page should contain at least 10 actions.
(It might be fewer if one actions requires several slide commands).
That means that you add at least 2 actions per day.
And don't make them last too long - about 5 seconds maximum
for each action.

Here are the suggested topics - but feel free to do something else.
Yours will probably be longer than those described below.

2013 Hammer A Nail
2012 Inflate A Balloon and Pop It!
2011 Watering A Plant
2010 Dispense an Appropriate Amount of Hand Sanitizer into a Hand
2009 Replace an Incandescent Light Bulb with a More Energy Efficient
          Light Emitting Design
2008 Assemble a Hamburger
2007 Squeeze the Juice from an Orange
2006 Shred 5 Sheets of Paper
2005 Change Batteries and Turn on a 2-battery Flashlight
2004 Select, Mark and Cast an Election Ballot
2003 Select, Crush and Recycle and Empty Soft Drink Can
2002 Select, Raise and Wave a U.S. Flag
2001 Select, Clean and Peel an Apple
2000 Fill and Seal a Time Capsule with 20th Century Inventions
1999 Set a Golf Tee and Tee Up a Golf Ball
1998 Shut Off An Alarm Clock
1997 Insert and Then Play a CD Disc
1996 Put Coins in a Bank
1995 Turn on a Radio
1994 Make Cup of Coffee
1993 Screw a Light Bulb into a Socket
1992 Unlock a Combination Padlock
1991 Toast a Slice of Bread
1990 Put the Lid on a Ball Jar
1989 Sharpen a Pencil
1988 Adhere a Stamp to a Letter
1987 Put Toothpaste on a Toothbrush

== Due Date : Wed 17 Oct at 18:00 ==

When you turn in your Rube-Goldberg page,
you should COMPRESS the folder and upload
it in Haiku.


Sliding and Visibility - 8 Oct 2018

Look at this web-page:

Then download this .zip file, uncompress it,
open the pinball.html file in Komodo,
and then do the practice described on the page.


Trippin' 'round the World - 25 Sep 2018

Today we will do some more practice Slide and SetTimeout.
Download world2018.zip and unpack it - you can view it here.

Then use Komodo and open the openmovequiz.html file.

- Browse the page and find out what is wrong with the [canadaChina] button.
  Change the Slide command so that the bird goes to the right country.

- For the CanadaChina trip, add a setTimeout command so that
   the bird also flies to China, waits, and then flies back to Canada

- Add another Button for a "round trip" from Canada to Australia to South Africa to Canada.

- Add a picture of a boat (a small boat) - you need to copy it into the World2018 folder

- Add a button for a BOAT trip from England to India.
   This must stay in the water, traveling around the south end of Africa
    and then back up to India.  You will need several Slide/SetTimeout commands
    to make sure the boat stays in the water.

- Add more Buttons and trips, as time permits.
   It's all good practice.


Sliding Around - 24 Sep 2018

We will look at this sample page:

The teacher will explain how the code works.

Then download the .zip archive, open the page in Komodo,
and do the practice exercises shown on the page.


Small Divs Project - 18 Sep 2018

You can start with this sample page:
   http://ibcomp.fis.edu/2018/comptech/Animals.html

- Change the big picture to a different picture.  Your picture 
   should have various objects/people/places that can be identified.
- Make BUTTONS that move a box over various objects.
   The box should change sizes (width/height) to match the object
   that it is marking - like the Lion and Giraffe buttons in the example
- Make DIVs (boxes) that appear when you click on an object.
   These boxes should have a transparent background color
   and should also display some text about the object -
   like the Butterfly and Elephant boxes in the example
- Make as many buttons and boxes as you can in the time you have.

This project is due on Friday 21 Sept at 18:00.

Turn it in to Haiku.  You should COMPRESS the folder containing
your work and upload it into the Haiku assignment.


Working with DIVs - 17 Sep 2018

Try this page:   http://ibcomp.fis.edu/2018/comptech/Animals.html
Click around and see what happens.

The Animals page uses BUTTONS and DIVS to identify specific animals.

(0) Open the Animals page.  Right-click and choose [View Page Source].
     Copy the HTML and JavaScript source code into a new page in Komodo.
     Then [File][Save As] ... Animals.html

(1) Add another BUTTON for another animal -
     the BUTTON should move the orange box on top of the animal

(2) Add another colored-div that appears on top of another animal.

(3) Change the buttons so that the orange box always
     changes size to match the animal correctly.

(4) Add an IF command like the following:

      if(this.style.backgroundColor == "")
      {  
          this.innerHTML = "<H1>ELEPHANT</H1>"
          this.style.backgroundColor = "rgba(255, 0, 0, 0.2)"  
      }
      else
      {  
          this.innerHTML = "";
          this.style.backgroundColor = "";
       }

      This belongs inside the elephantDiv.onclick function.

       Then the elephant box turns on and off when you click.

(5)  Make the Butterfly DIV turn on and off when you click.

(6)  Now add more clickable buttons and more clickable boxes.
      Do as many animals as you can in one class period.


More Clickable Stacks - 12-13 Sep 2018

Type the HTML from your page.
This should be review questions for a class, like math.
When you click, a question appears.
When you click again, an answer appears.
The teacher will demonstrate the easy way to do this.

If you did not succeed with typing in the clickable questions page,
you can download a copy here:
http://ibcomp.fis.edu/2018/comptech/clickQuestions.html 


Clickable Picture Stack - 11 Sep 2018


then follow the instructions above.

Clickable Pictures Web-page - 28-31 Aug 2018

== Project ==
Use Komodo to write an HTML page, with Javascript for clicking.
- The page should be a maximum of 1000px wide and 700px high
- There should be at lease 8 pictures
- The page should have a TOPIC (theme) and all the pictures are connected to this topic
- The pictures must touch each other without overlapping 
- The pictures should more or less fill the browser window (1000x700)
- The pictures should NOT all be the same size, but rather a variety of sizes
- Each picture is clickable (use JavaScript) and changes to another picture when clicked.  
- At least some of the pictures should be altered by using a graphics editor like ipiccy.com
- All pictures and the HTML page must be stored together inside a single folder
- When finished, you must COMPRESS the folder and upload it into Haiku


Position Absolute - 27 Aug 2018

This web-page demonstrates the use STYLE to control the position and size of images:

The teacher will explain how POSITION:ABSOLUTE and STYLE work,
as well as giving an assignment that is due on Friday.

Normal Web-page Editing - 24 Aug 2018

If we use a normal web-page editor, like Komodo, then we can write
HTML and store the page in a folder on the local hard-disk.
This has one significant advantage over online storage -
we can also store images in the local folder and load them
easily and quickly - much better than loading slowly from Google Drive.

Here is a web-page plus images all stored in a .zip archive:

== PRACTICE ==
  • download the funnyfaces.zip file.  Double-click to extract (unpack) it
  • open the index.html file and make sure it works properly
  • Use KOMODO to add two more pictures (actually 4 images) below the two faces -
    these should also start with 2 "funny" pictures and change when clicked
  • You need to copy/download your pictures into the SAME FOLDER (funnyfaces)
    with the web-page and the other 4 pictures.  Use file names that you can remember,
    so when you add commands in the web-page you write the correct file names.
    Notice that in the web-page, you just write the simple file name -
    no folder names and no web-server addresses
  • If you finish early, add more pictures.  It's all practice so that
    you become faster and you REMEMBER what you need to do.
Starting Monday, you will create a small project web-page, 
and then turn it in for a grade on Friday 31 Aug.

Using JavaScript for Mouse-Clicks - 22 Aug 2018

Here is a sample web-page with two "quizzes".
When you click on the disguised image, the original image appears: 

In each case, the original image was loaded into ipiccy.com,
then disguised, then moved to a web-server.  You can save your
images on Google Drive.

You should copy the code in the sample web-page.  Then:
- change the two sample pictures to other pictures that you made
- add 2 more pictures in a row beneath the other 2 images
- the 2 new images should also be disguised,
   and change to the originals when clicked.

You will need to add JavaScript functions for each new image. 
If you finish early, add a couple more images.

== HOMEWORK ==
Before our next class (Friday) you need to 
download and install KOMODO from:
https://www.activestate.com/komodo-ide/downloads/edit


Storing Your Own Images - 21 Aug 2018

Look at this sample web-page: https://html.house/edit/bleob6nv.html 

The dog was originally very cute and cuddly, but Mr Mulkey
downloaded the image, painted the eyes red, and added
black horns on top of the original ears.  Then he stored the
finished image on Google Drive.

Adding a custom picture - one that is not stored on a web-site -
involves several steps.  
  • Find an image that you want to modify
  • Open the image in ipiccy.com (or some other graphics editor that you like)
  • Make whatever changes you wish
  • Save the finished image on your computer, perhaps on the desktop
  • Upload your image to Google Drive (after you have logged in)
  • Right-click on the Google Drive image and choose [Share]
    Click on [Advanced]
    Click [Change] and choose [Public on the Web]
    Click [Save] and then [Done]
    Now your image can be shared inside an HTML Web-Page
  • Right click on the image file name and choose [Get Shareable Link]
    Copy this URL 
  • In your web-page, paste the URL into the src= part of an <img command.
  • Now, CHANGE the URL by removing "open" and replacing it with "uc".
    Now it will say "https://drive.google.com/uc?id=xxxxxxxxxxxxxxx..."
If you do all that correctly, the image should appear in your web-page.

Take the web-page that you made yesterday, and change each of the images in your page.
Add text to an image, or draw colorful shapes on it, make the image smaller (crop), re-color it, etc.
Try a variety of tools in ipiccy.  In each case, save the result and upload the result,
and then change the image address in your web-page to display the changed Google Drive image.

It's practice - do as many as you can in one period.
You are likely to make a couple mistakes - ask for help if something isn't working.


Starting HTML - 20 Aug 2018

Here is a sample HTML page: 


<!DOCTYPE html>
<html>

 <body>
  <h1>Clowns</h1>
    
  Here are some pictures of clowns.<br>
  We need to arrange them nicely.<br>
  <br>
    
  <img height=200 src="https://www.allanandfriends.com/img/allan-and-friends-studios-logo.png">

  <img height=200 width=348 src="https://www.allanandfriends.com/wp-content/uploads/2017/06/afs-clowns-cover-photo-6-976x600.jpg">

  <br>

  <img height=240 src="https://cdn.images.dailystar.co.uk/dynamic/1/photos/671000/620x/clowns-555886.jpg">  

  <img height=240 src="http://cuddlesandbilly.com/uploads/ckeditor/pictures/2/content_cuddlesandbilly.jpg">

 </body>
 
</html>


The teacher will explain how this works.  

Today you can use :  https://html.house/
The teacher will demonstrate how to use this.

= PRACTICE =
Copy the sample HTML code above into html.house.
Then make the following changes:
- Change one of the clown pictures to a different picture - no a clown.
  Did the size stay the same?
- Change the page to have 4 pictures that you used in your Word-Processing pictures page.
- Make your 4 pictures line up nicely, so they fit in a nice rectangle.
- Add 2 more pictures, one in each row so you have 2 rows of 3 pictures.
- Add one more row of 3 pictures.
If you finish early, add more pictures.  It's practice - the goal is to become fast
and productive and to remember what you did.


Finish your Pictures Page - 16 Aug 2018

Finish your pictures page, including at least 8 pictures and
with CITATION links to the original images, and then turn
in your page in Haiku.  If you used Google Docs, you need to
[Download to : PDF document], save this on your computer's hard-drive,
and then upload the PDF document into Haiku.  If you don't know
how to do those, or you experience problems, you need to ask for help.

If you finish early, you may read any of the articles (marked with pictures)
on the class web-site at : 
https://fiscomp.weebly.com/


Downloading Images - 15 Aug 2018

- Today's Assignment -
We will collect some pictures from Google Images - http://images.google.com 
and display them in a Word-Processing Document.

>> Read these notes about collecting images. 

Be sure to save your page often (at least once every 10 minutes).  
This assignment will be due next week - the specific date will appear in Haiku.

Daily Work - Computers Required - Bring Your Computer Every Day

Each student needs a computer for class every day  .. more ..
  
=== Homework ===
Read the following notes about this course.

Welcome to Comp Tech Advanced

Comp Tech Adv is an introduction to Computer Science, mostly involving creation of automated systems via programming or clever and effective use of computer tools.  .. more ..
~~~~  read this whenever time permits ~~~